WordPress
This integration works with HSPs', Resellers, and Marketplaces.
Note
Currently, this beta version of the Blackwall WordPress plugin is available exclusively to WordPress sites within our partner networks. The full General Availability (GA) release will be released soon.
Blackwall integrates seamlessly with the WordPress Content Management System (CMS) via a dedicated plugin. This plugin enables Blackwall’s security and performance features to be applied directly to your WordPress site without requiring manual configuration of server‐level settings. This makes Blackwall's features, such as bot management, DDoS protection, SSL termination, and CDN‐style caching available to your WordPress website. Once installed, the Blackwall plugin automatically routes incoming traffic through GateKeeper, protecting your site from malicious bots, mitigating volumetric attacks, and improving load times for visitors around the world.
To obtain the latest version of the Blackwall plugin, please contact the Blackwall team directly. We can provide you with a packaged ZIP file that you can upload to your WordPress account. This approach ensures you have the most up-to-date and stable release.
Install Blackwall's WordPress plugin
To install the module/plugin, execute the following steps:
- Contact The Blackwall team directly, who will provide you with a packaged ZIP file.
- After receiving the plugin ZIP from the Blackwall team, save it to a folder on your computer where you keep WordPress assets, or somewhere memorable. This makes it easy to locate when you’re ready to install.
- Leave the files zipped, since WordPress accepts the ZIP files directly, without unzipping. Although, if you wish to inspect the ZIP files, feel free to unzip them, inspect them, but then rezip them once inspection is complete.
- Log in to your WordPress account using valid credentials.
- From the left sidebar in your WordPress account, click Plugins > Add Plugin.
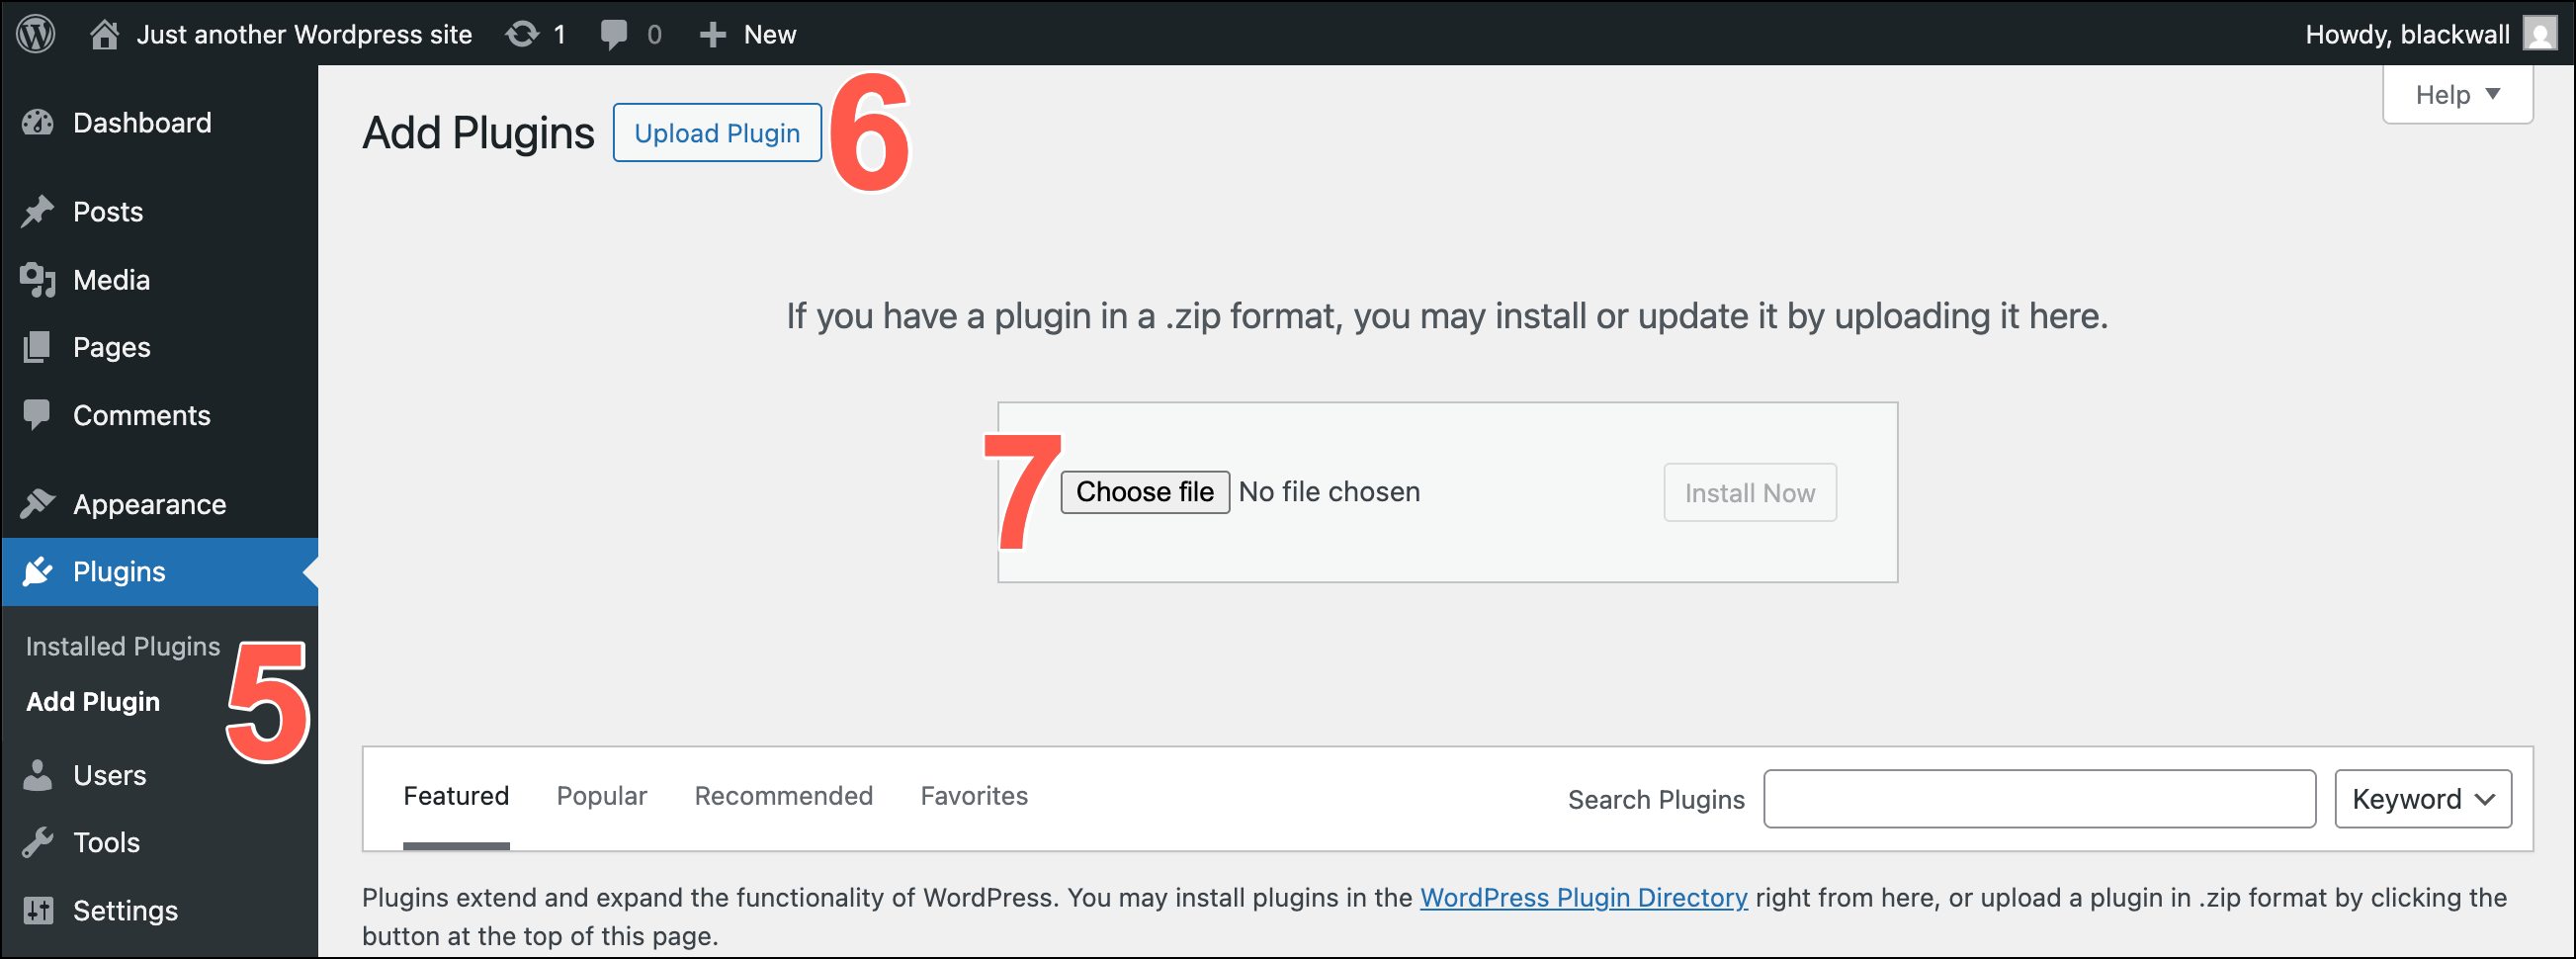
- From the top of the page displayed, click Upload Plugin
- Click Choose file.
- Navigate to your system's Downloads folder, or wherever you saved your plugin ZIP file in step 2. Select the ZIP file.
-
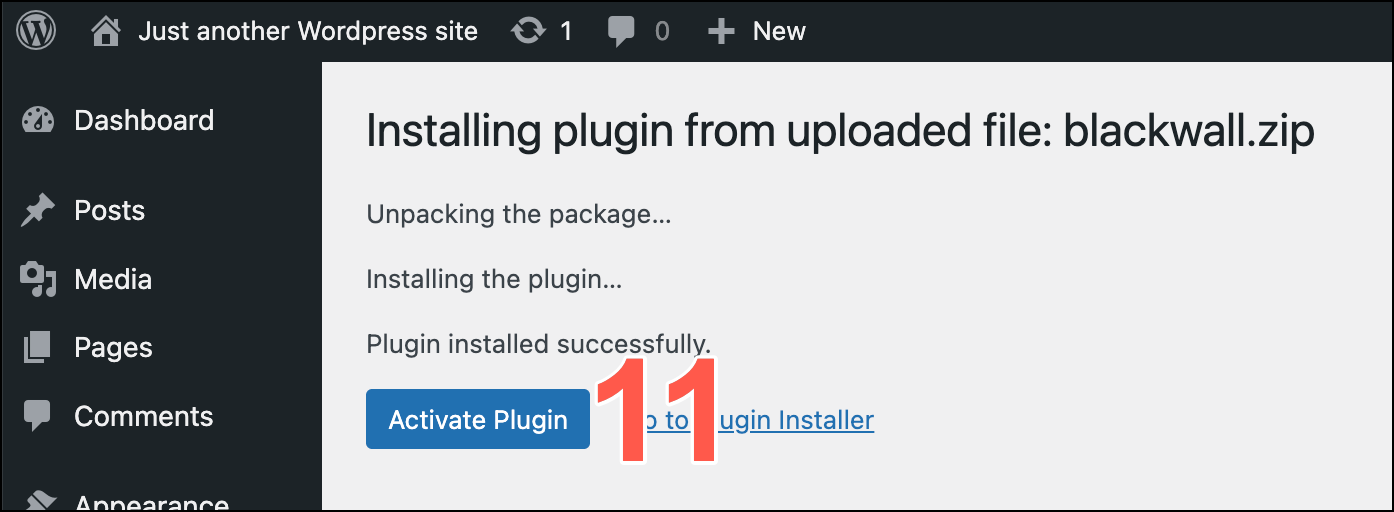
Verify that the displayed ZIP file name is for the file that you inteneded to select.

-
Click the Install Now button. It becomes active/able to be clicked once a file is selected in the previous step.
-
The installation progress now displays. Once the process is complete, click Activate Plugin.
-
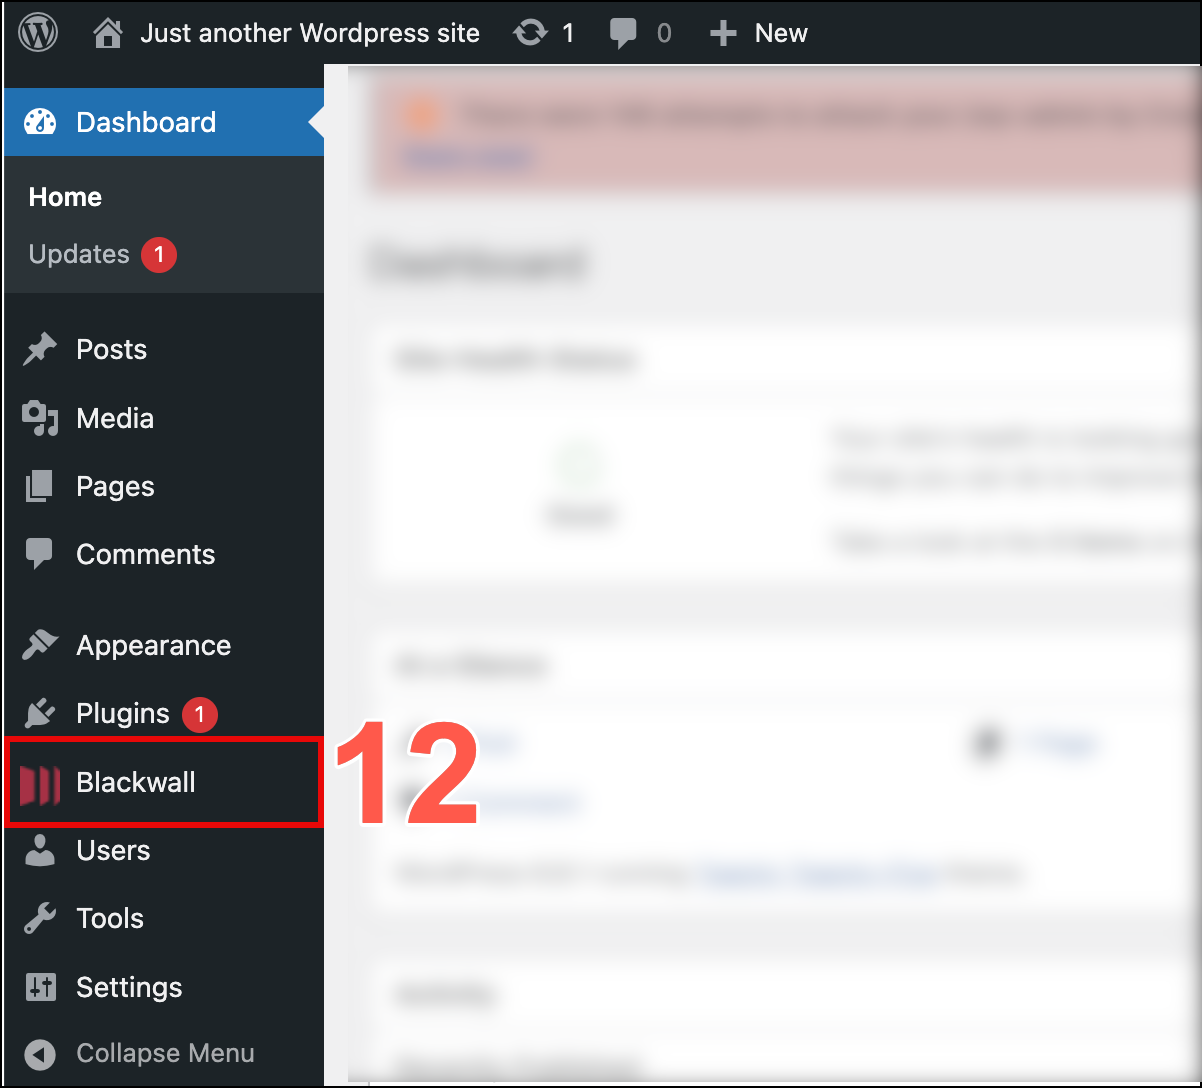
Confirm that your new Blackwall plugin is added to your WordPress account sidebar menu.
Installation of Blackwall's WordPress plugin is now complete. Next, configure your new plugin. to get the most out of the protection that it offers for your WordPress site(s).
Configure Blackwall's WordPress plugin
To configure your new plugin:
- Log in to your WordPress account using valid credentials.
- From the left sidebar, locate and click the Blackwall plugin.
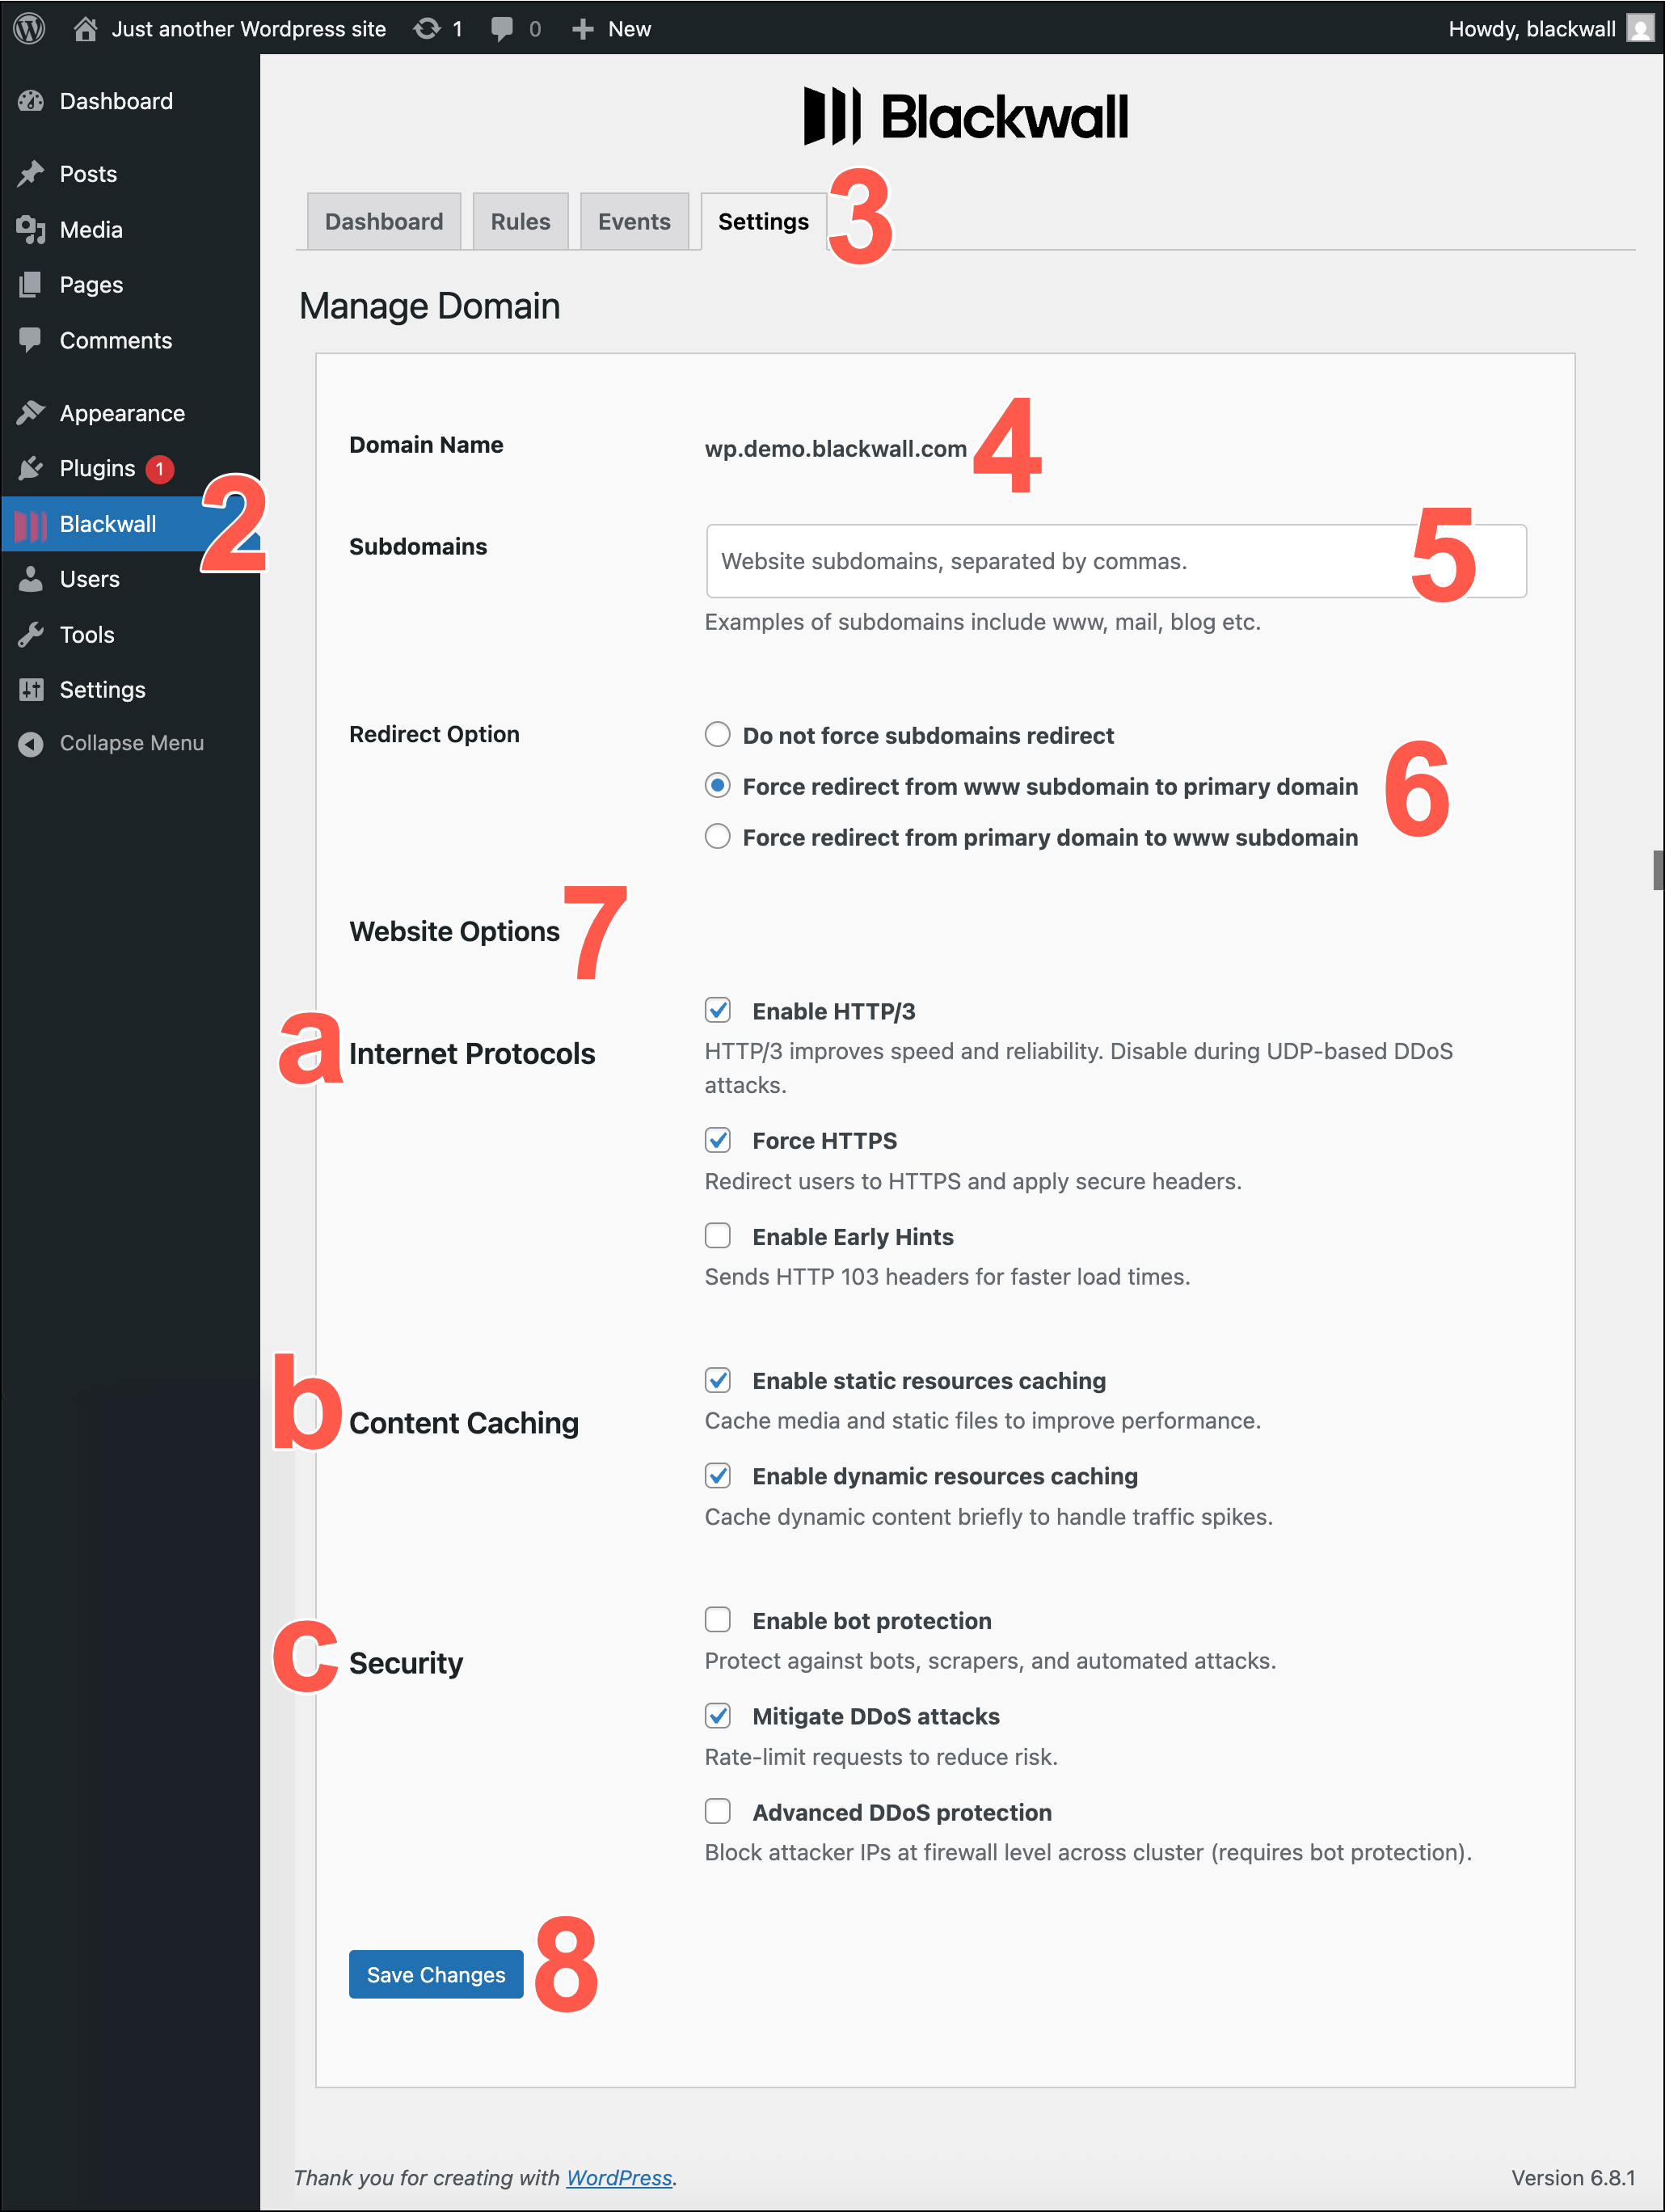
- In the top menu tabs of the Blackwall plugin page displayed, click Settings.
- In the Settings page displayed, ensure that the name of the domain you wish to configure is displayed in this field. This is a read‐only text input showing the fully qualified domain name.
- In the SUBDOMAINS field, enter any additional hostnames in comma-separated format that should be covered by GateKeeper’s certificate for this domain.
- If you added an additional hostname in the previous step, then for the Redirect Option, select one of the available radio buttons to control how requests to any listed subdomains are redirected back to the canonical hostname.
- The Website Options section contains a series of checkboxes under sub-headings. These checkboxes enable you to configure how GateKeeper interacts with your domains.
- Internet protocols - Control advanced HTTP/encryption features:
- Enable HTTP/3 - GateKeeper will speak HTTP/3 (QUIC/UDP) to compatible clients, improving performance on modern browsers and mobile devices. Leave unchecked if you need to disable HTTP/3 for compatibility or DDoS concerns.
- Force HTTPS - Enable to automatically redirect all incoming HTTP (port 80) requests to HTTPS (port 443). When checked, GateKeeper also adds security headers to encourage browsers to use only HTTPS.
- Enable Early Hints - Allows GateKeeper to send HTTP 103 “Early Hints” responses during the initial TLS handshake, so that browsers can start preloading resources (e.g., CSS/JS) before the final HTML is delivered. This improves load times, leading to a faster browsing experience.
- Content Caching - Decide how GateKeeper should cache your site’s assets:
- Enable static resources caching - If checked, GateKeeper caches images, CSS, JavaScript, and other static files locally on the edge. This speeds up asset delivery and reduces load on your origin server.
- Enable dynamic resources caching - If checked, GateKeeper also caches HTML pages and other 'dynamic' content for a configurable short period. Use with caution: caching dynamic content may cause delays in showing newly published data (e.g., blog posts, user-specific pages).
- Security - Configure GateKeeper’s built-in bot management and DDoS mitigation features:
- Enable bot protection - When checked, GateKeeper’s Web Application Firewall (WAF) and Bot Management services inspect incoming requests to block known malicious bots, scrapers, and automated attacks.
- Mitigate DDoS attacks - This option limits the number of simultaneous connections and the rate of requests from a single IP to help prevent volumetric or application-layer DDoS floods. Requires bot protection enabled first.
- Advanced DDoS protection - If enabled (and if bot protection is already on), GateKeeper will block attacking IPs at the firewall level for the entire cluster—returning a TCP RST or UDP rejection instead of serving HTTP 403 pages. Use this only if your site has experienced large-scale DDoS events.
- Internet protocols - Control advanced HTTP/encryption features:
- Once you have finished modifying any of the above settings, click Save Changes to apply your updates. GateKeeper immediately attempts to validate SSL certificates, update DNS checks (if necessary), and reconfigure its servers. If any required fields are missing or invalid (for example, an upstream address is unreachable), an error is displayed.
Configure Blackwall plugin rules
To configure rules for your new plugin:
- Log in to your WordPress account using valid credentials.
- From the left sidebar, locate and click the Blackwall plugin.
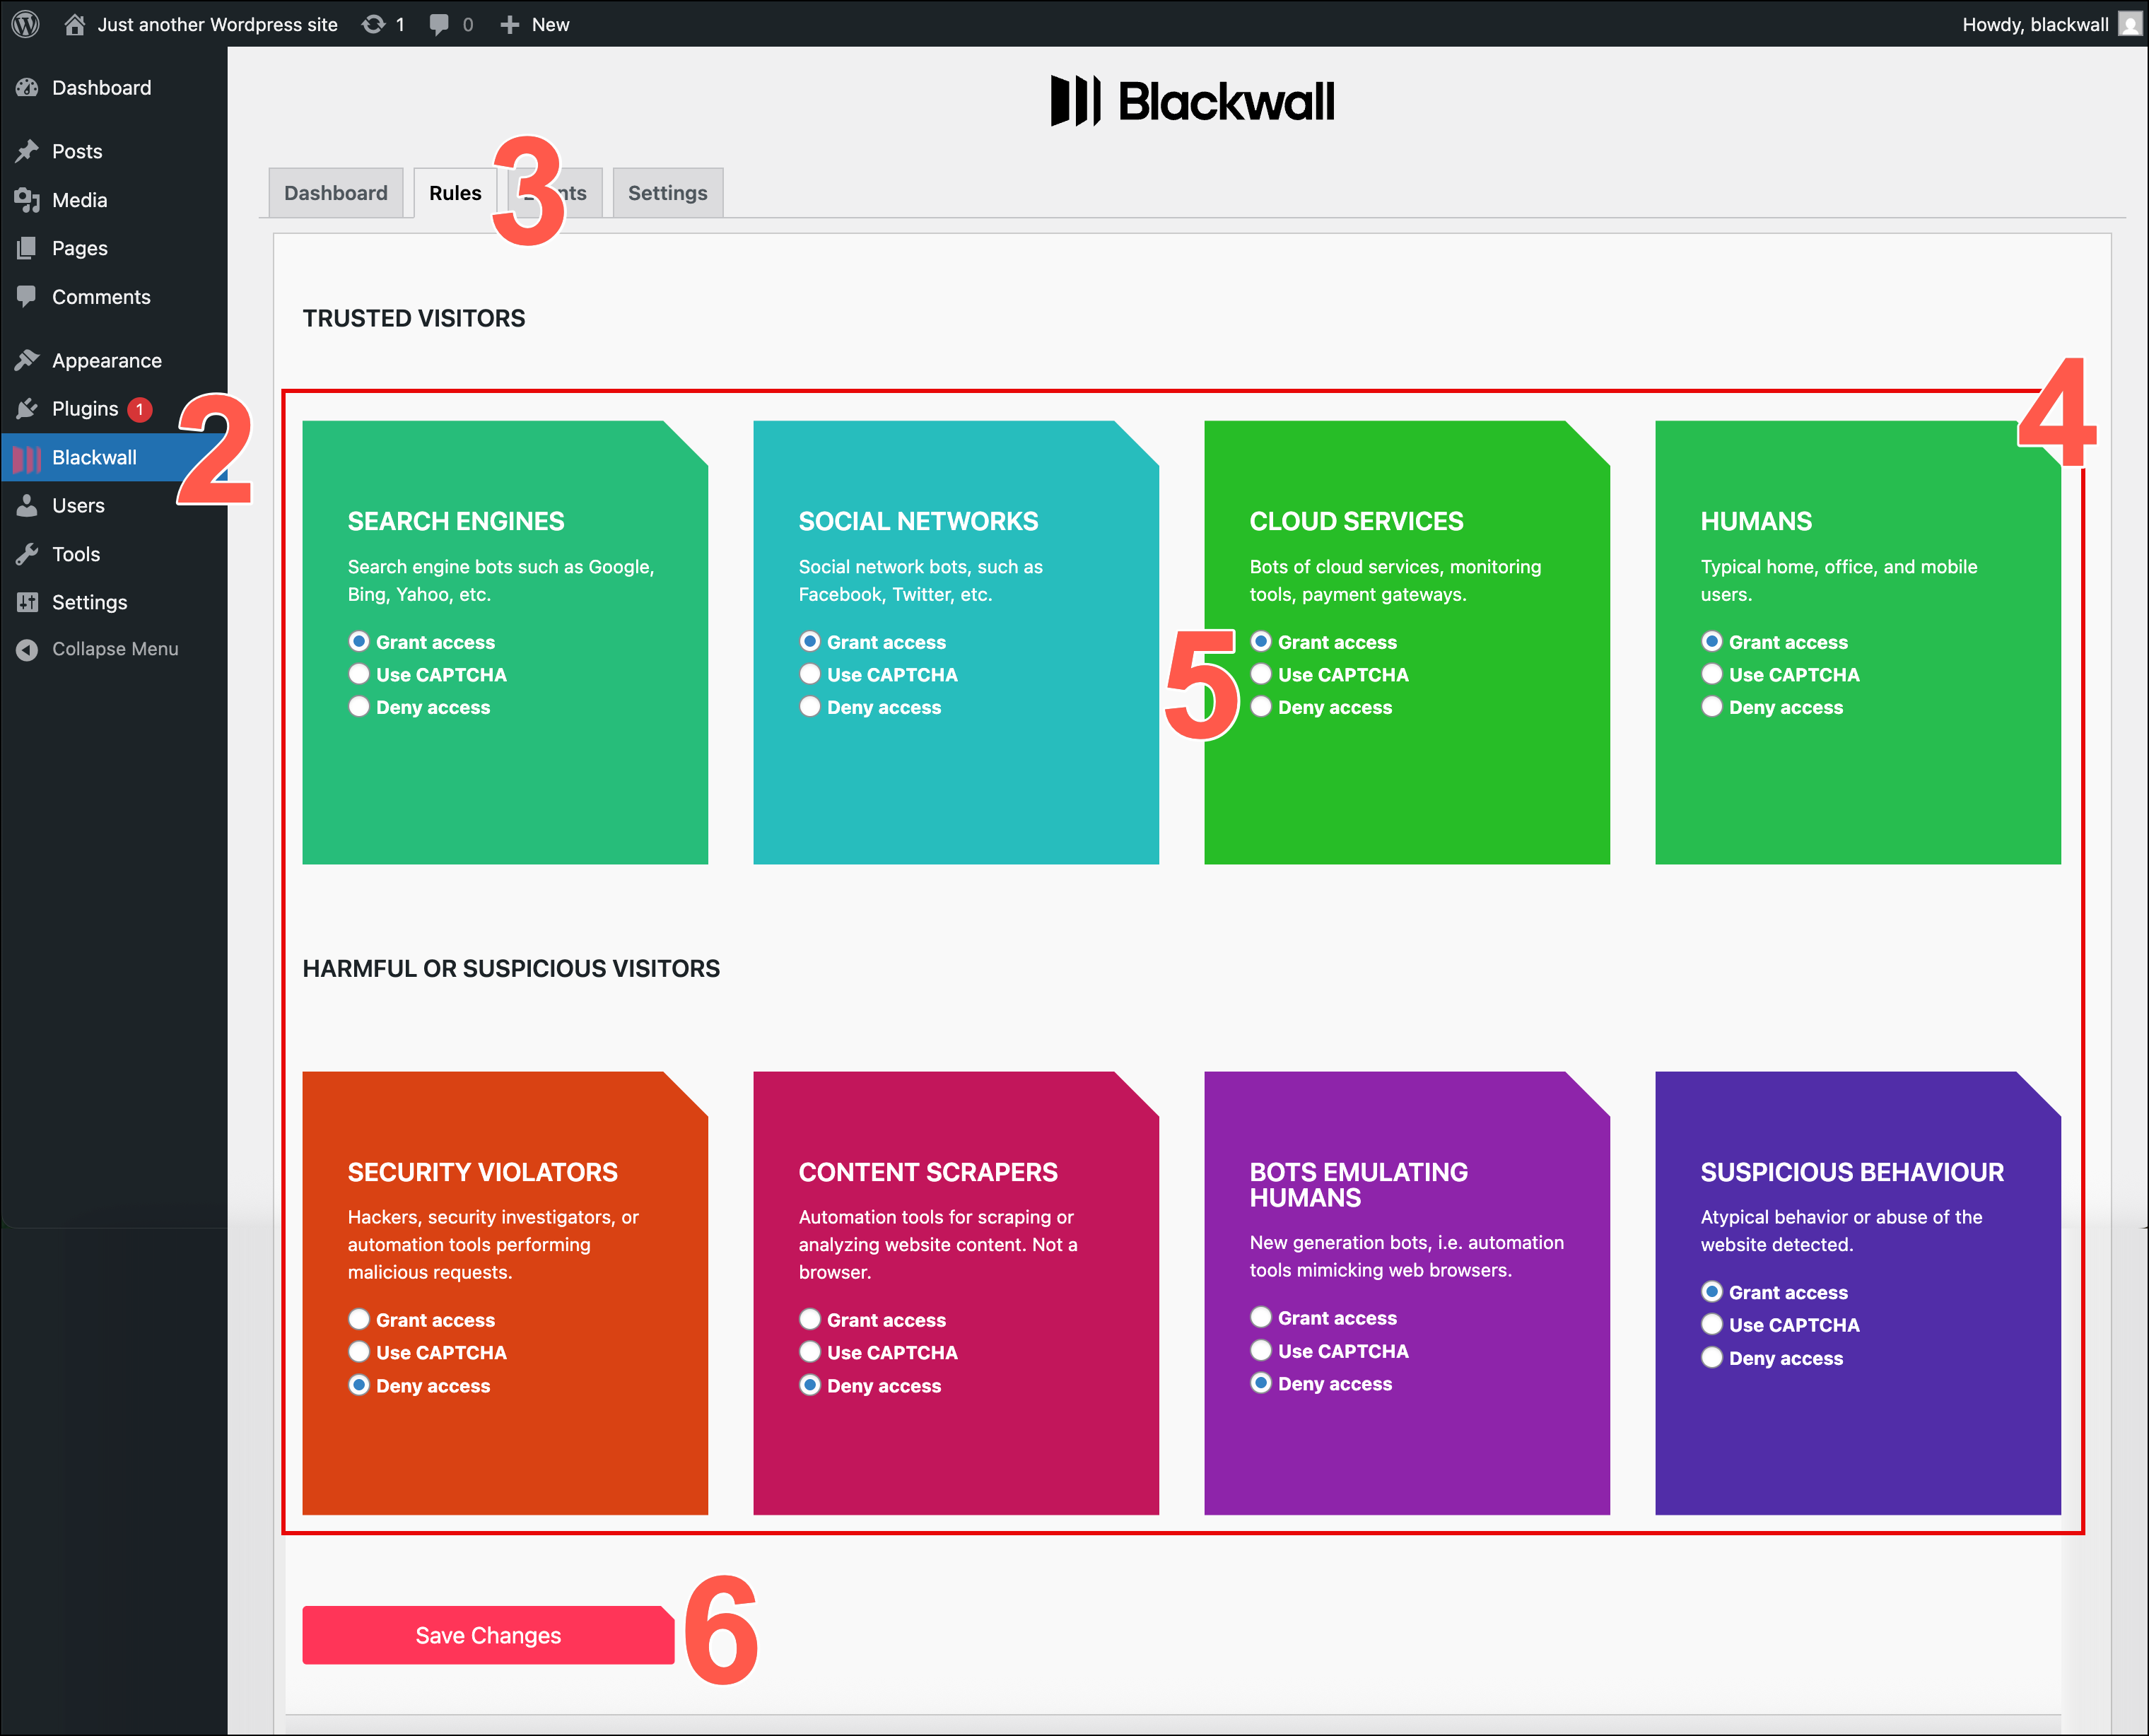
- In the top menu tabs of the Blackwall plugin page displayed, click Rules.
- From the eight core rules displayed, locate the rule(s) that you wish to modify.
- For the rule that you choose to modify, select a radio button that corresponds to your desired behaviour. The radio buttons possible are:
- Grant access
- Deny access
- Use CAPTCHA
- Click Save Changes to save your changes.
Note
Blackwall recommends keeping Blackwall's default rule settings, unless you have a particular use case that necessitates a change.
Using Blackwall's WordPress plugin
The Dashboard tab gives you a simple, comprehensive, and objective snapshot of your security status and provides associated metrics. These aggregated results and statuses are presented in manageable chunks of visual information that enable you to see what is going well, what needs improvement, and if necessary, where action is required.
In the context of the Blackwall platform, Events are the actions, activities, or occurrences that the platform tracks and analyzes to determine whether traffic is generated by a human or a bot. Events are fundamental to Blackwall's detection capabilities, as they provide the raw data needed to make critical decisions about suspicious or malicious behavior.
To access Dashboard or Events:
- Log in to your WordPress account using valid credentials.
- From the left sidebar, locate and click the Blackwall plugin.
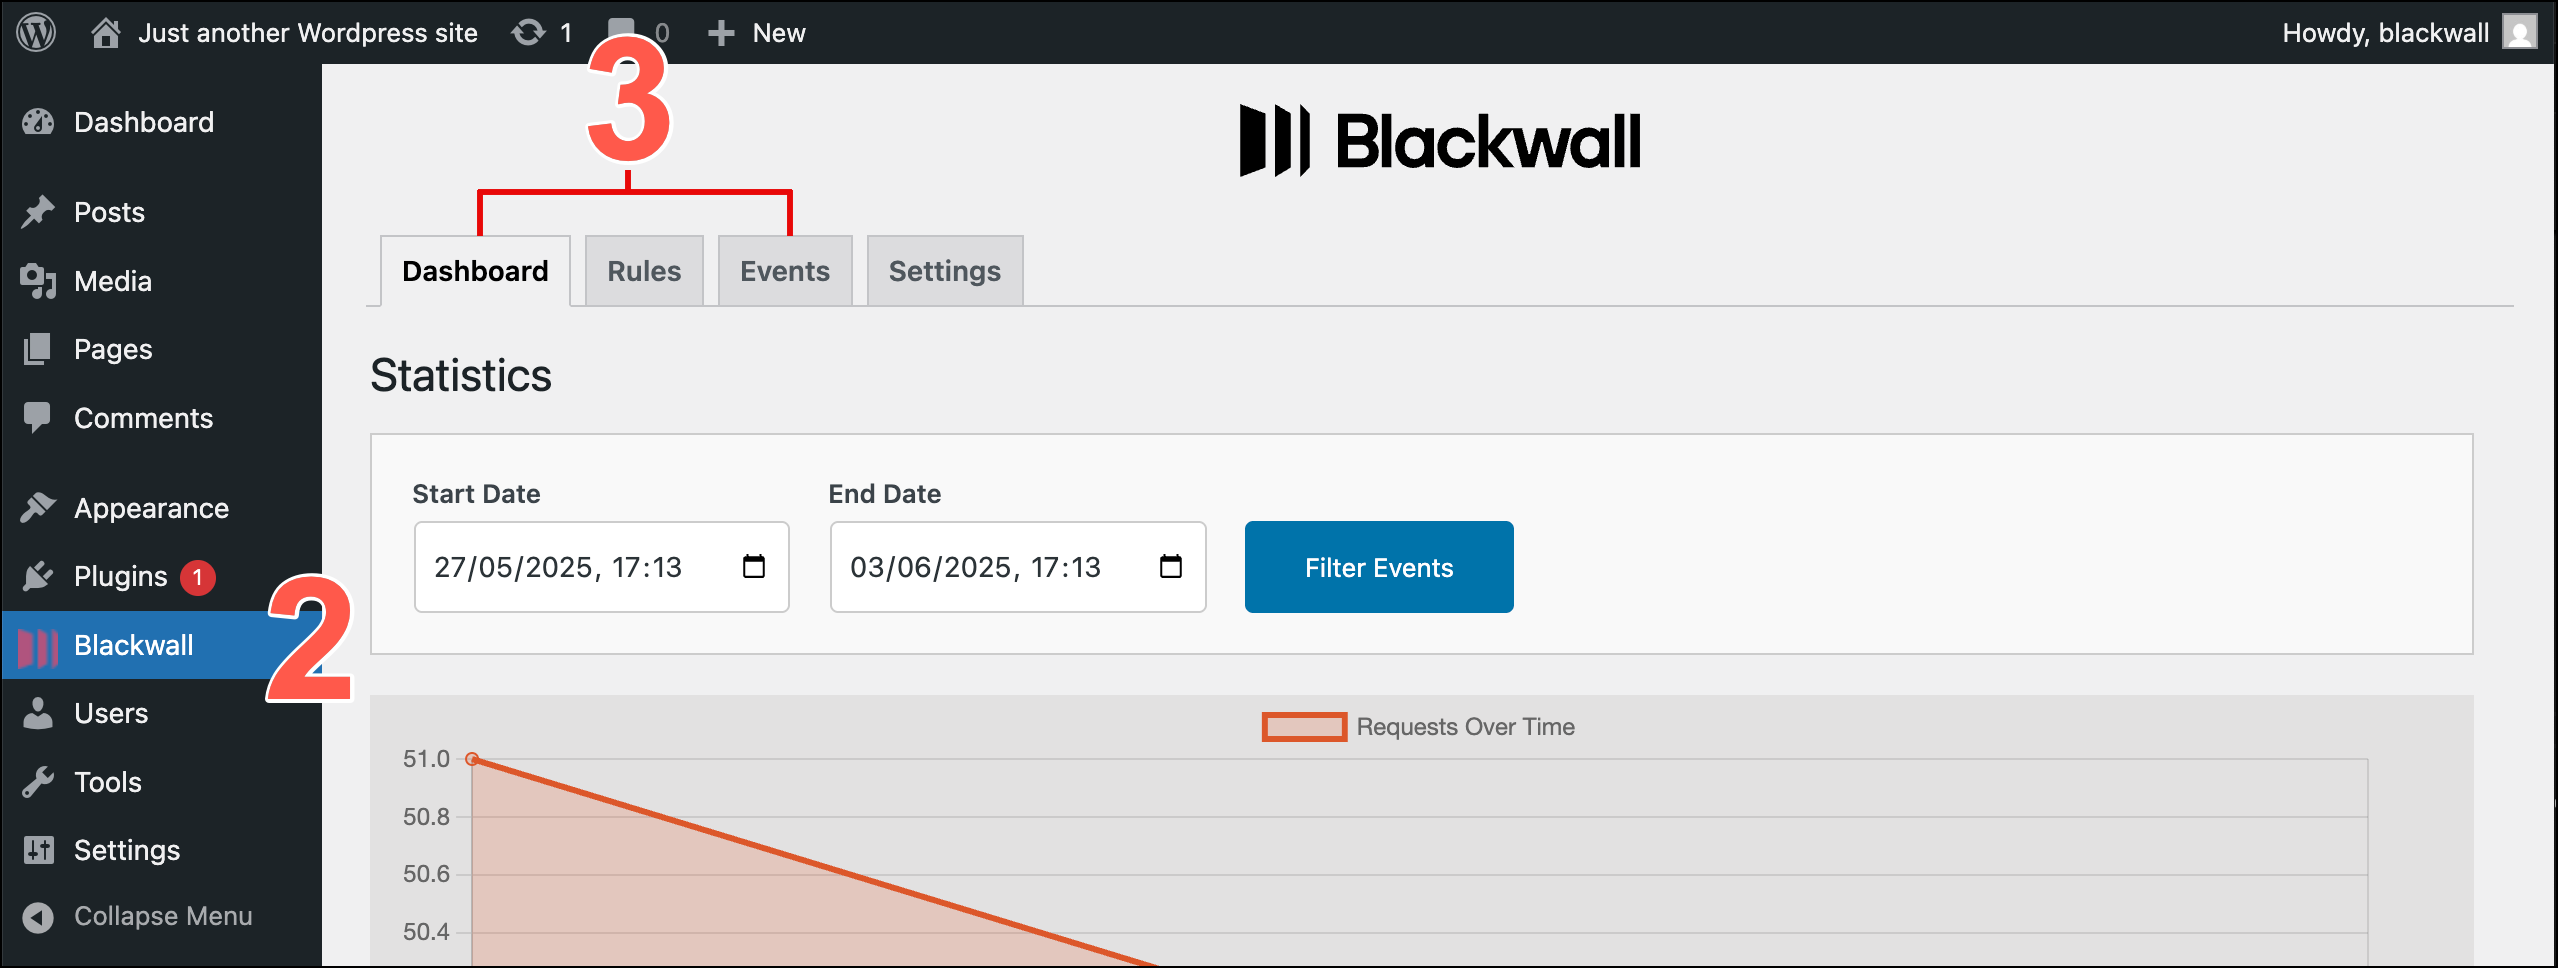
- In the top menu tabs of the Blackwall plugin page displayed, click Dashboard or Events.
- Peruse the statistics and monitoring details on both pages, which relate to traffic for your WordPress site.