Plesk Installation
This integration works with HSPs', Resellers, and Marketplaces.
Prerequisites
Before you begin, check these Plesk documenation links to make sure that all prerequisites are satisfied:
- Ensure that your Hardware Requirements are sufficient.
- Ensure that Plesk supports your current operating system - Supported Operating Systems.
- Check that your current browser is supported - Supported Browsers.
Installation
For regular Plesk installations, you can download and install the Plesk extension in one of two ways:
Sudo priveleges
The SSH user must have sudo privileges on the server to run Plesk CLI commands.
To download and install the integration via command line:
- On your machine, open a new terminal.
- Run the SSH command: ssh username@your_plesk_server_ip.
- If prompted, review and accept the host fingerprint.
-
Authenticate using your password or an SSH key (if configured).
(Alternative to steps 1-4, install the Plesk extension for ssh terminal and use it instead.)
-
Run the command:
-
If prompted for a password, enter the password associated with your sudo-enabled user.
- Once the installation is complete, check that the Blackwall extension has been added successfully:
- From the left sidebar, click Extensions.
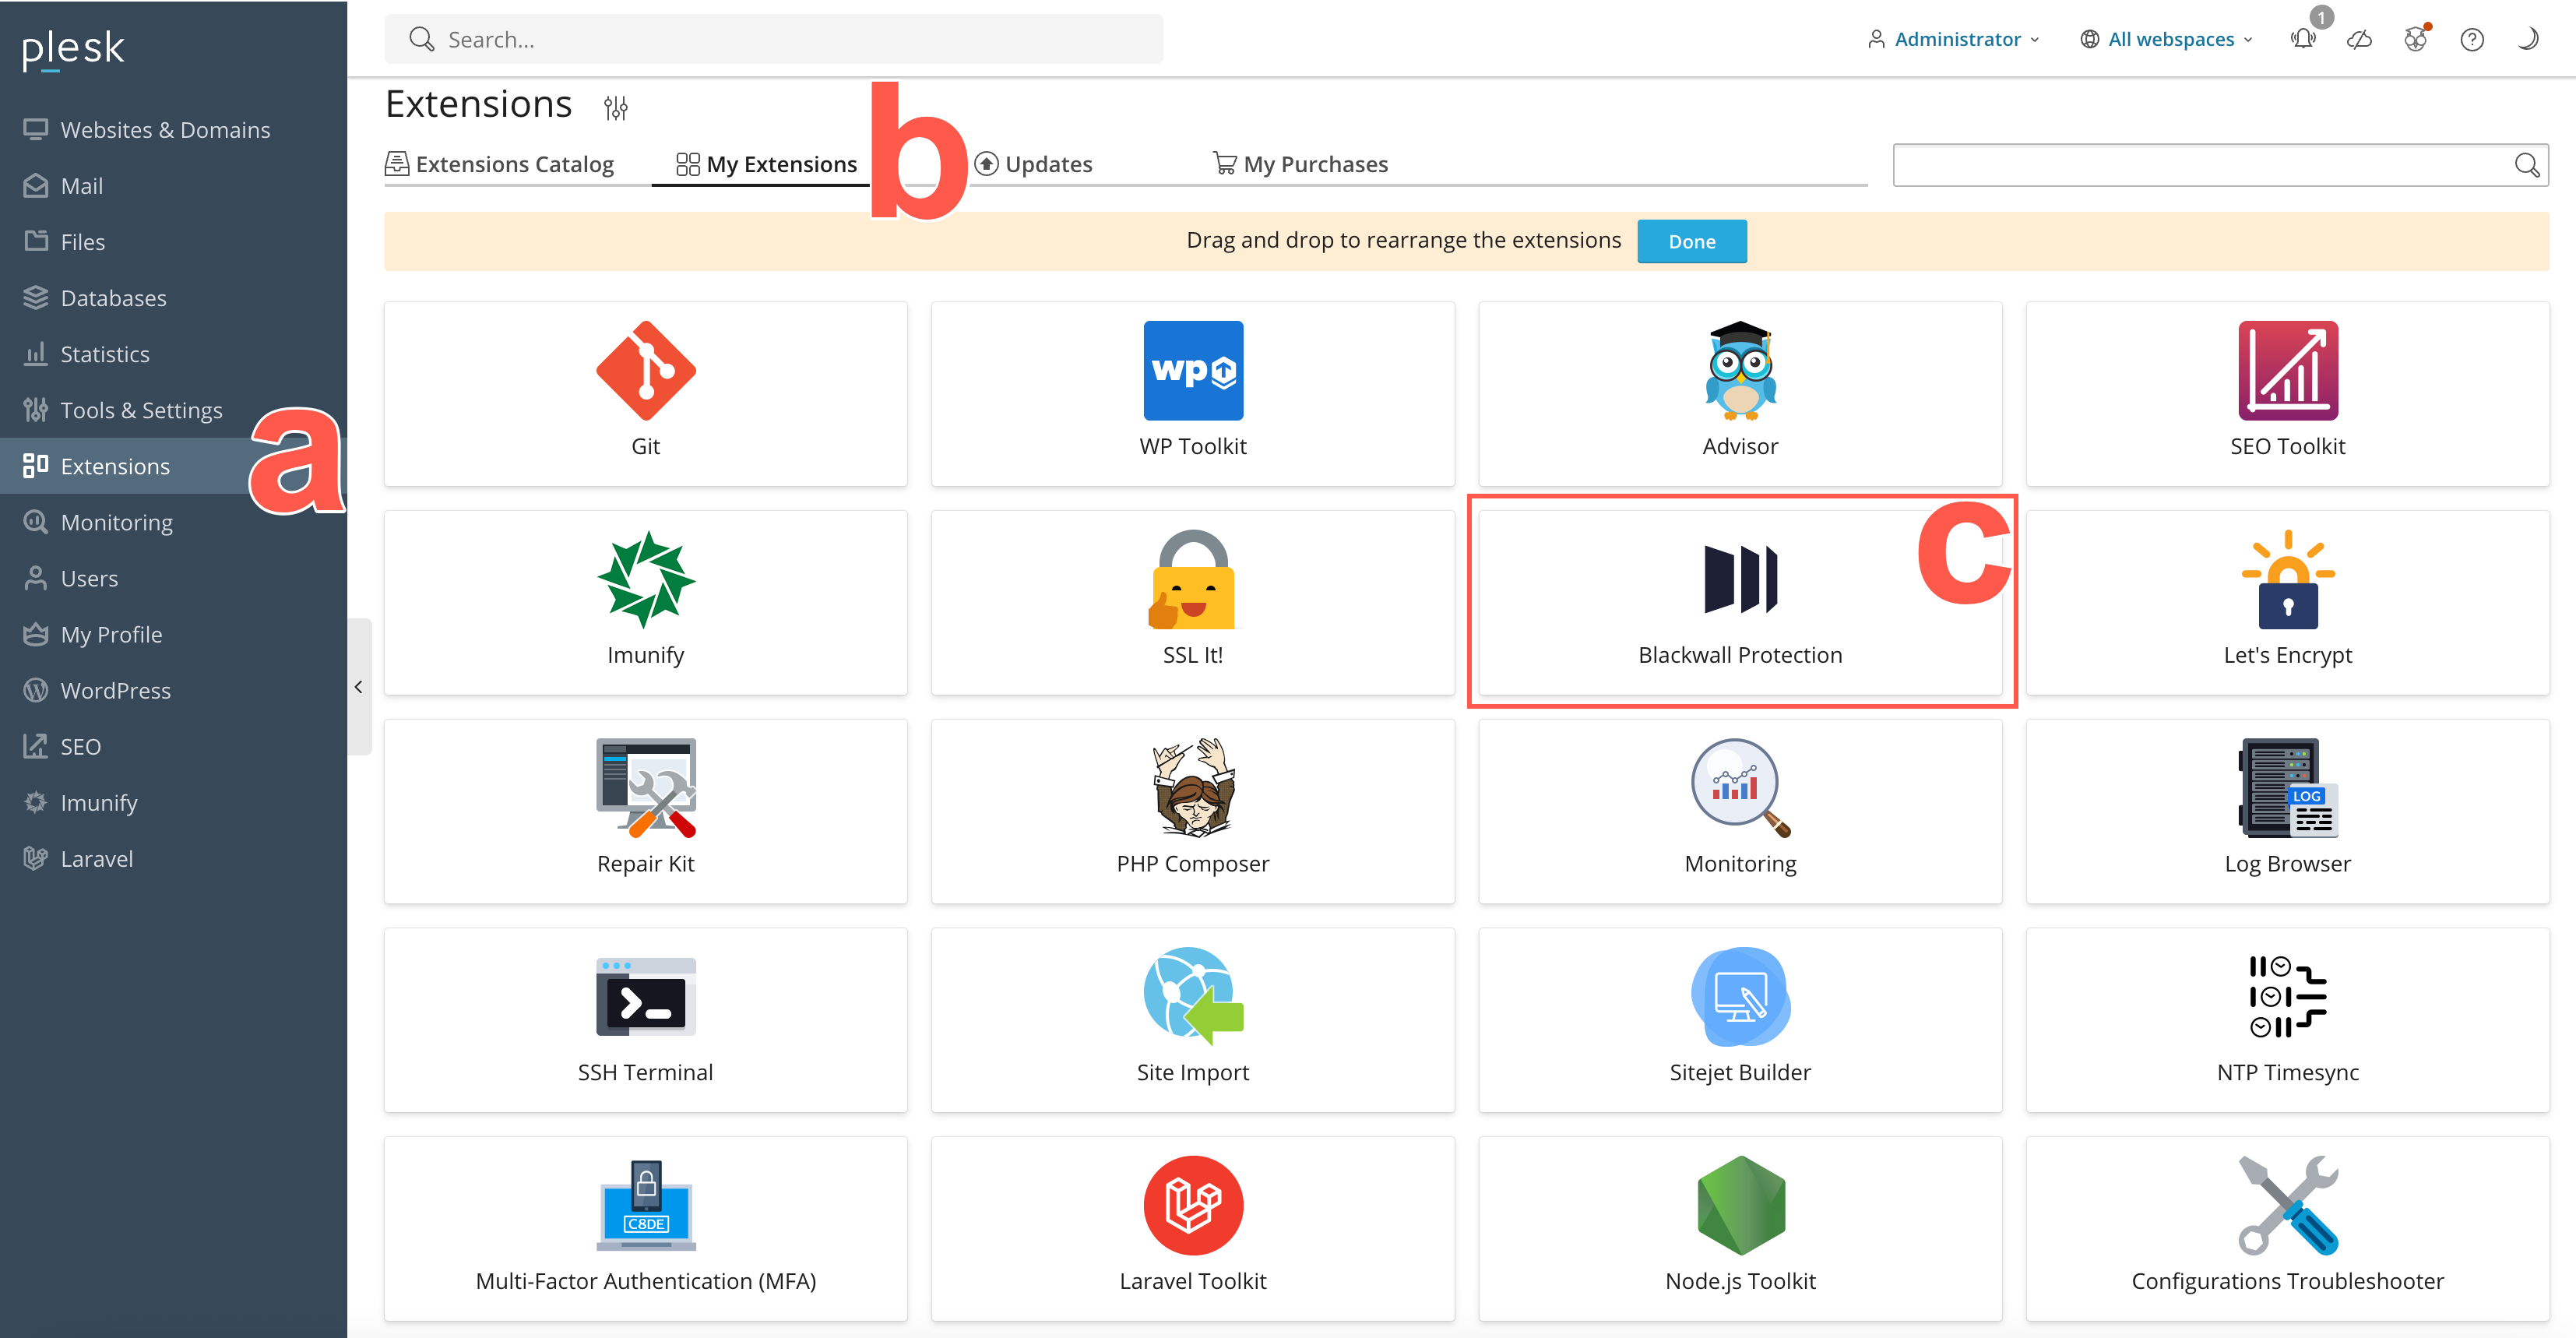
- Then click the My Extensions tab.
- Scroll the listed extensions until you find the newly added Blackwall extension.
- From the left sidebar, click Extensions.
Installation via Plesk Extensions Catalog coming soon...
Configuration
There are several types of configuration that can be executed. Some are mandatory and some optional.
Mandatory Configuration
- Log in to your Plesk account and in the left sidebar, click Blackwall Protection. This sidebar link appears automatically following installation of the extension in admin accounts. Alternatively, from the left sidebar, click Extensions, then My Extensions tab, scroll the listed extensions until you find the newly added Blackwall extension, and finally click the Blackwall extension.
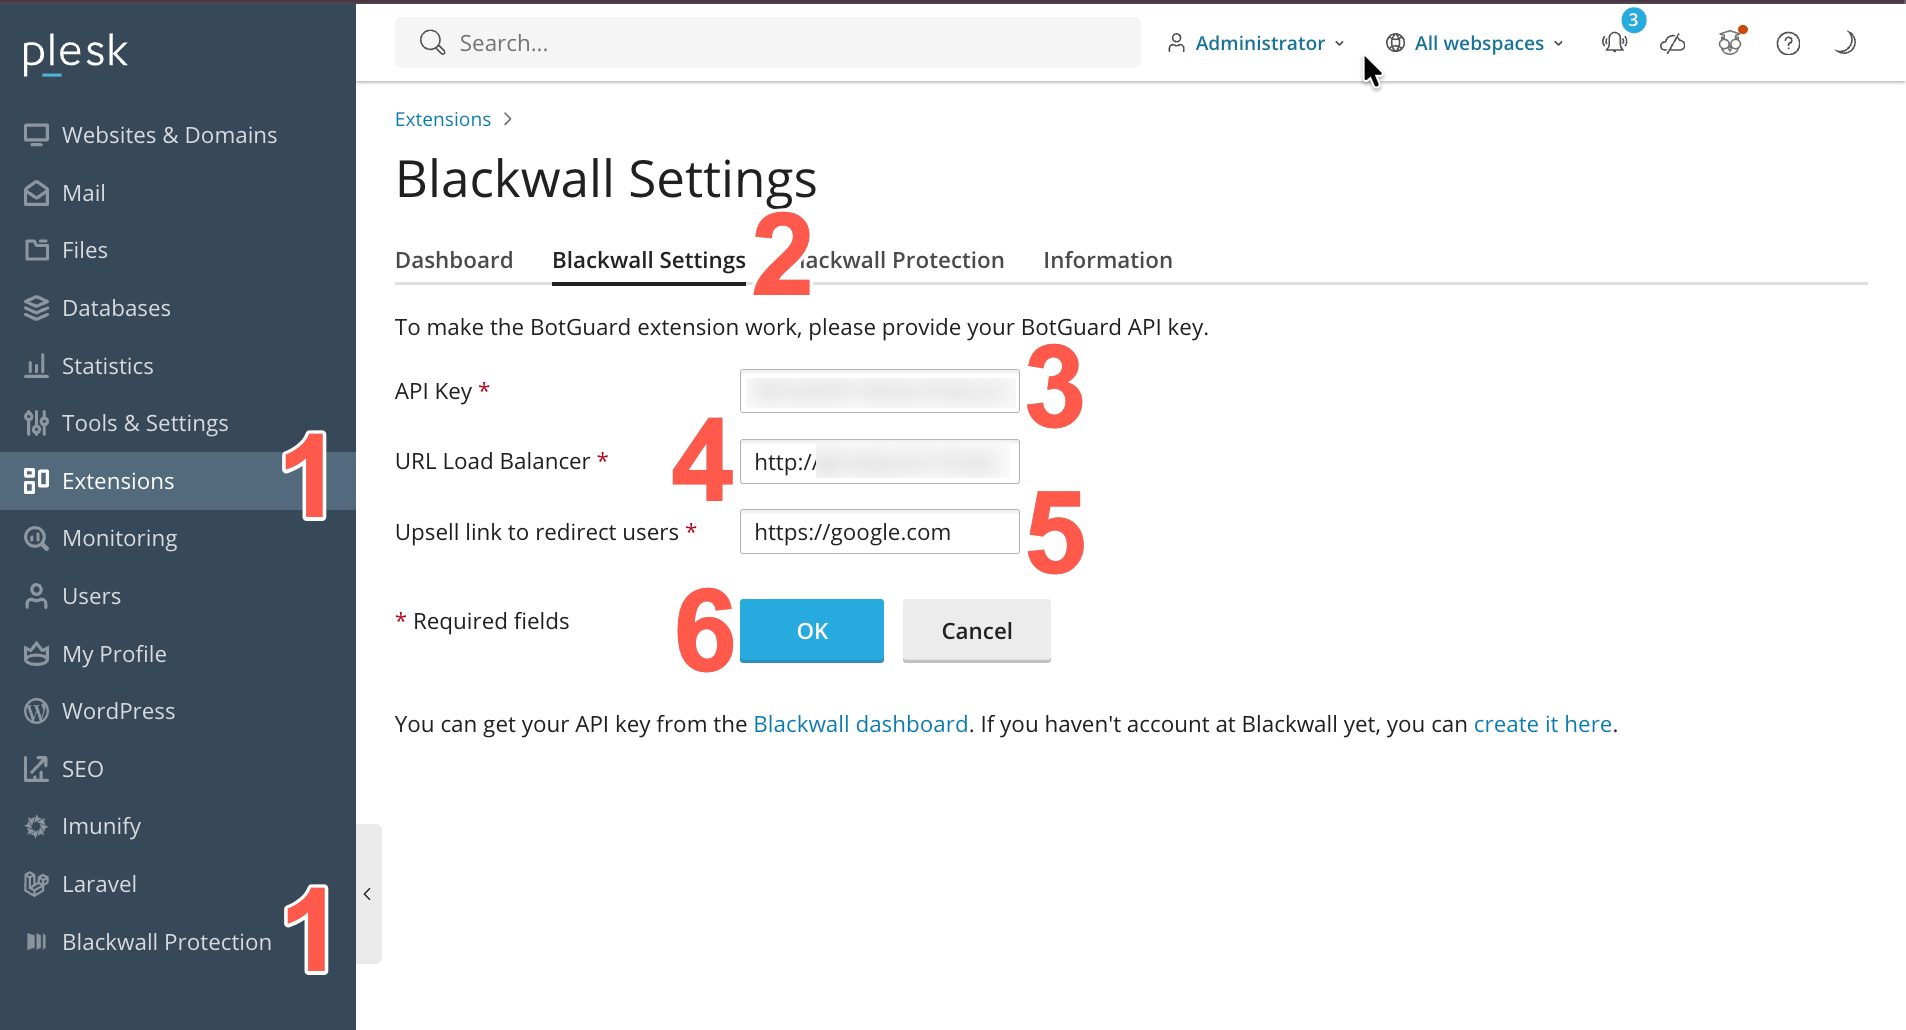
- When the Blackwall extension page displays, click the Blackwall Settings tab.
- Paste your API Key, which is copied from your Blackwall dashboard. Refer to Blackwall account credentials for guidance how to access your API key.
- Paste your URL Load Balancer address including the port number, e.g. https://xxx-xx-xxxxxxx.xxxxxxxxx.net:8443. The plugin uses this to automatically fetch the IP addresses of Gatekeeper instance(s) via its DNS results. The Blackwall extension then adds the Plesk server domain into your Gatekeeper instance to automatically assign the nearest Blackwall servers. It may take a little time for the settings page to appear.
- In the Upsell link field, paste the full URL (include https://) of the page where you want Plesk users to land if they try to access premium/paid Blackwall services.
- Click OK.
- After successful configuration, a success banner displays to inform you that all configuration was executed successfully. If any error displays, check the API key and server addresses.
Optional Configuration of Core Rules
Blackwall core rules apply to all domains configured in your Blackwall protected Plesk account. Blackwall recommends keeping Blackwall's default core rule settings, unless you have a particular use case that necessitates a change. If you want to access and configure Core Rules, perform the following tasks:
- Log in to your Plesk account and in the left sidebar, click Blackwall Protection. This sidebar link appears automatically following installation of the extension in admin accounts. Alternatively, from the left sidebar, click Extensions, then My Extensions tab, scroll the listed extensions until you find the newly added Blackwall extension, and finally click the Blackwall extension.
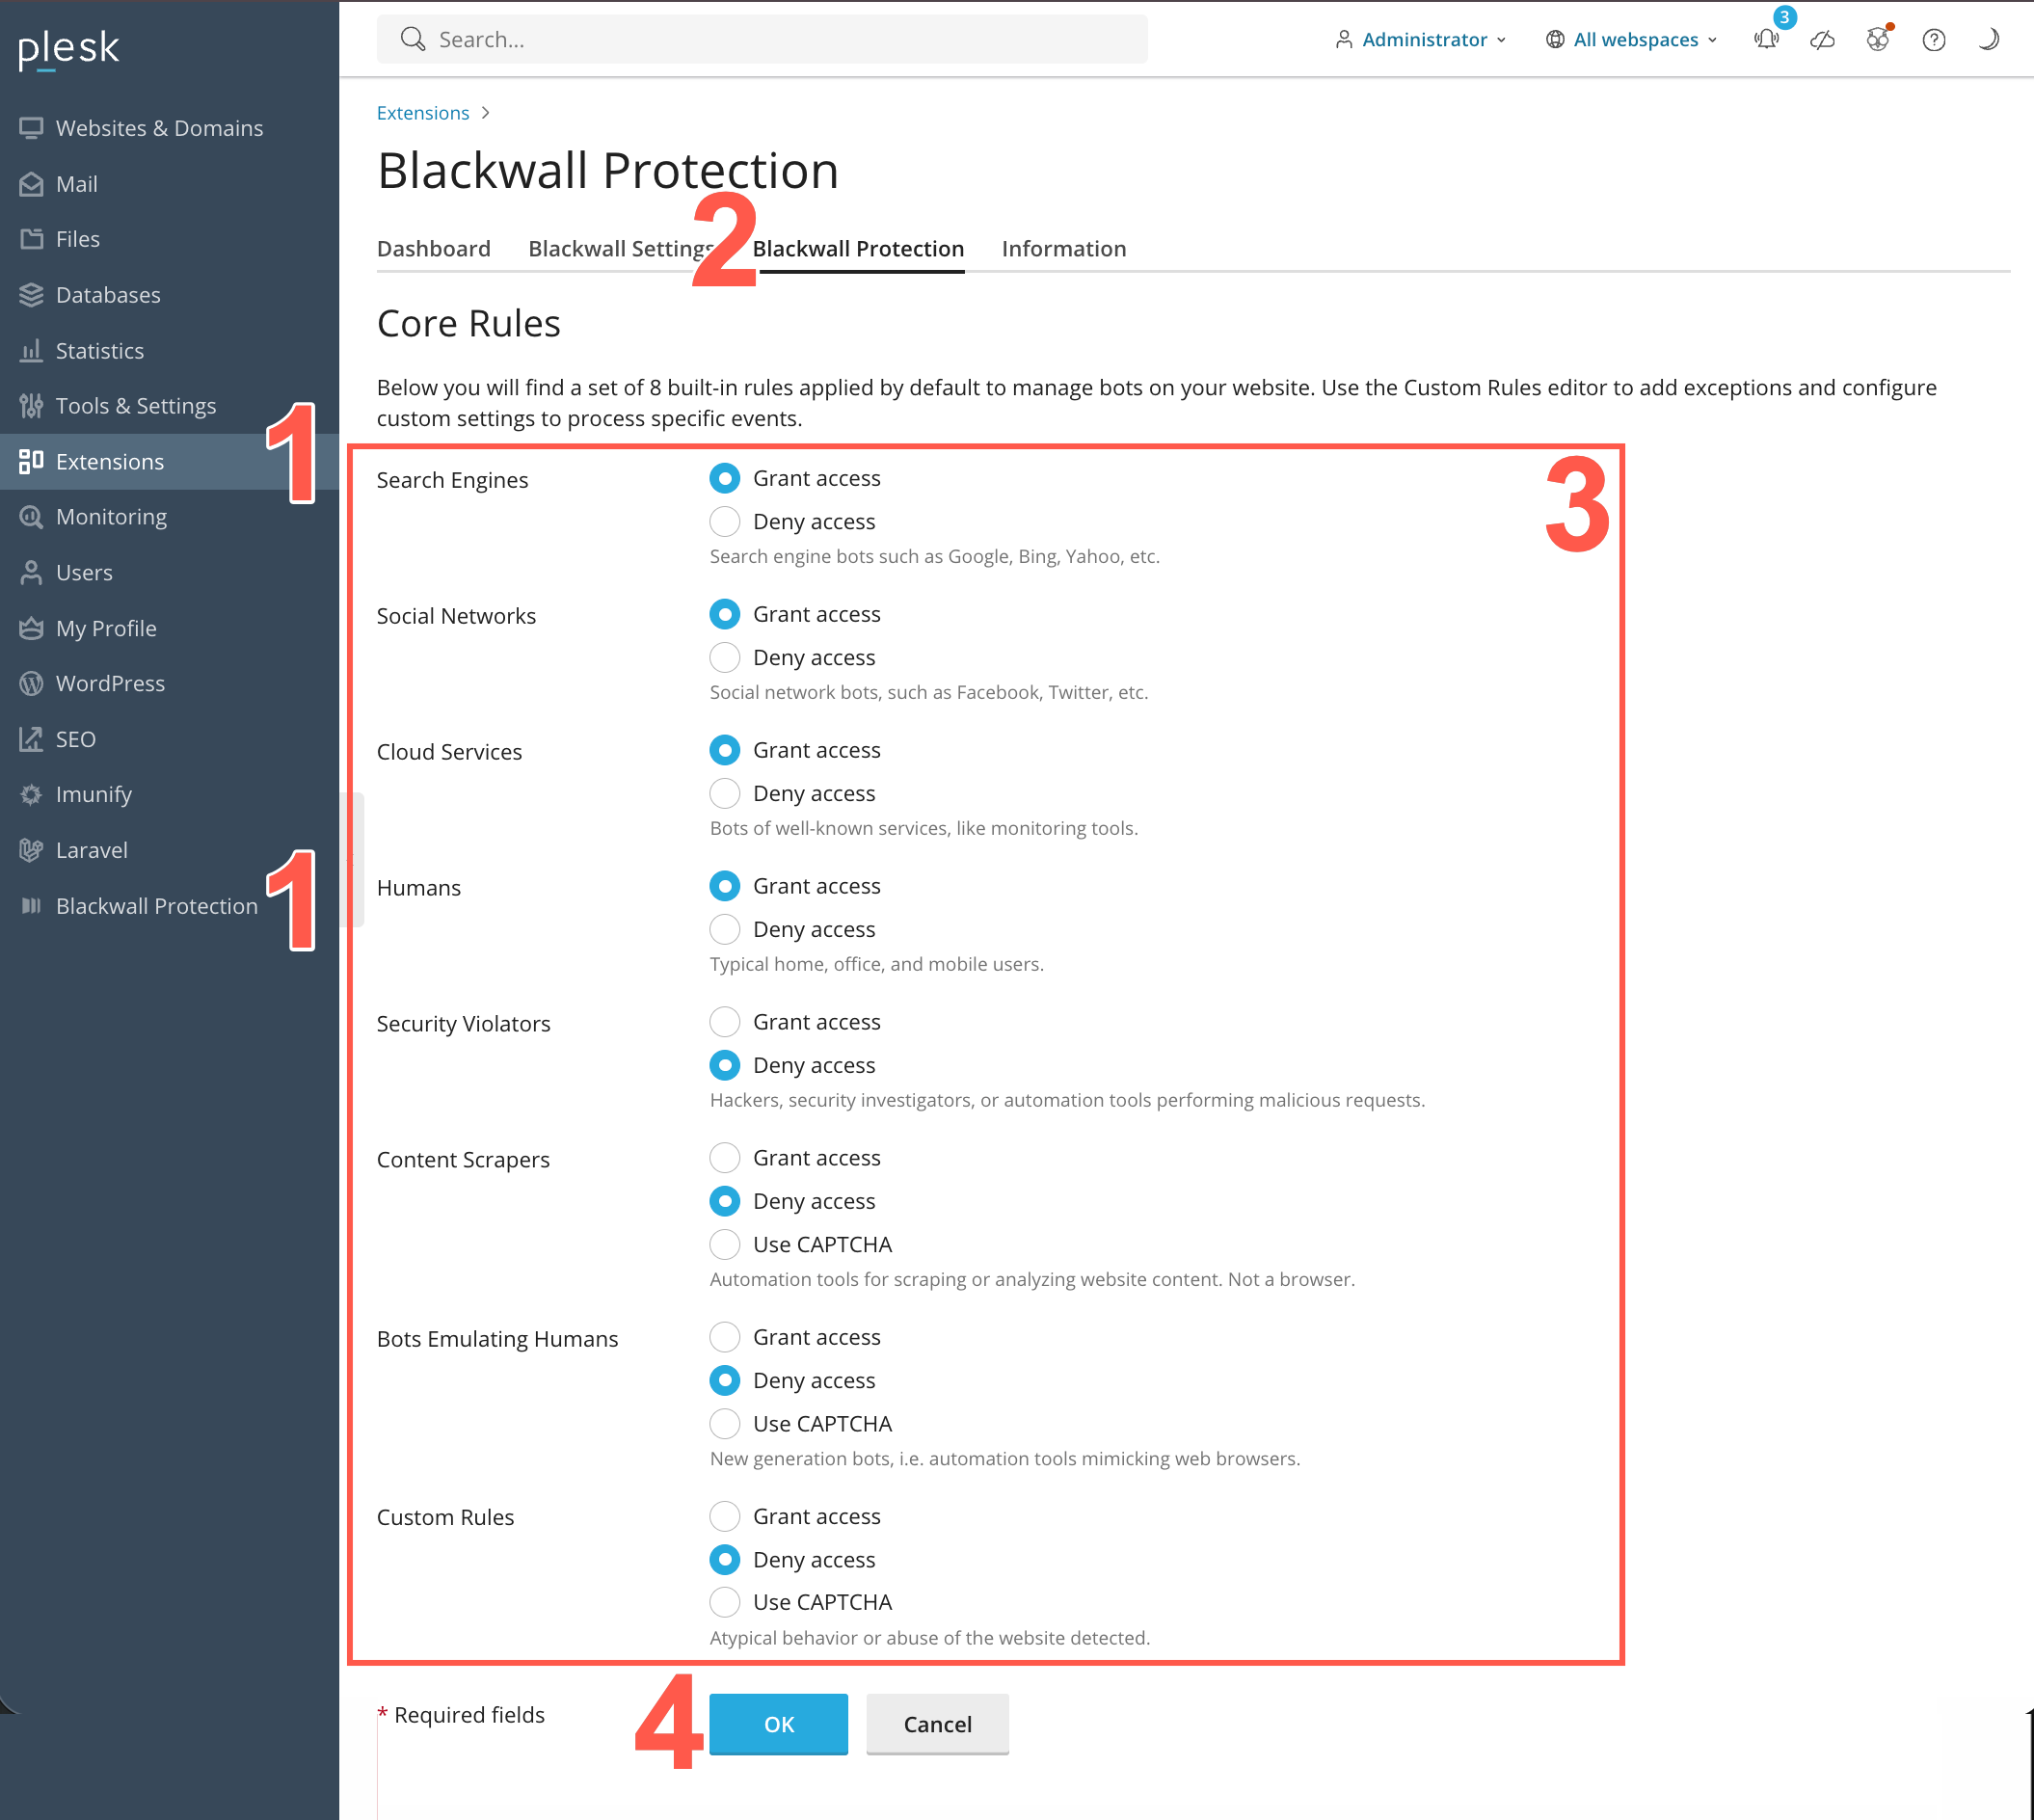
- When the Blackwall extension page displays, select the Blackwall Potection tab.
- From the eight core rules displayed, locate the rule that you wish to modify, then select a radio button that corresponds to your desired behaviour. The available radio buttons are:
- Grant access
- Deny access
- Use CAPTCHA (only available on some rules)
- Click OK to save your changes.
Optional Review of Extension Information
To review the Blackwall extension version information, perform the following steps:
- Log in to your Plesk account and in the left sidebar, click Blackwall Protection. This sidebar link appears automatically following installation of the extension in admin accounts. Alternatively, from the left sidebar, click Extensions, then My Extensions tab, scroll the listed extensions until you find the newly added Blackwall extension, and finally click the Blackwall extension.
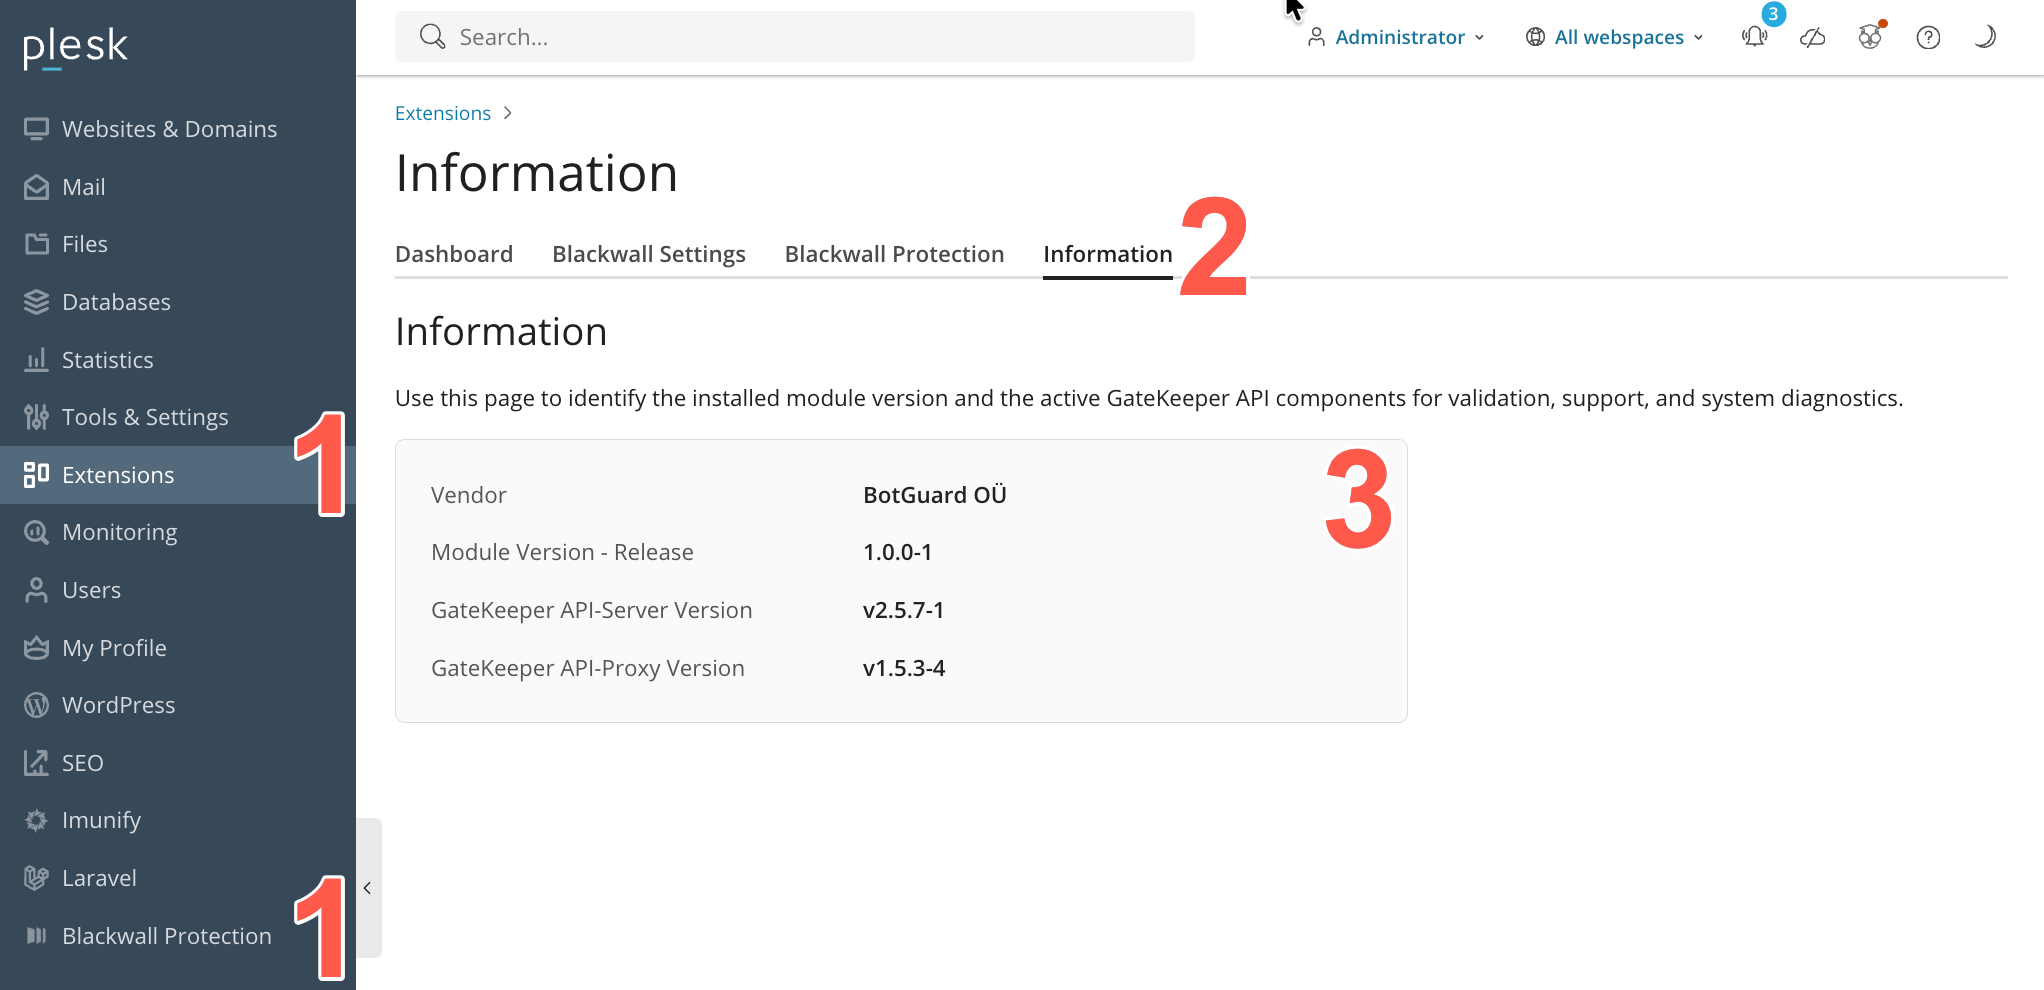
- When the Blackwall extension page displays, select the Information tab.
- Review the extension details, Module Version, API-Server Version, and API-Proxy Version.
Enabling/Disabling Domain Protection
If the Blackwall extension is active for a Plesk account, Blackwall protection is available for all domains and subdomains associated with the Plesk account. To allow more granular control, you can enable or disable the Blackwall extension on a case by case basis. To enable protection, perfom the following steps:
- Log into your Plesk account.
- From the left sidebar, select Websites & Domains.
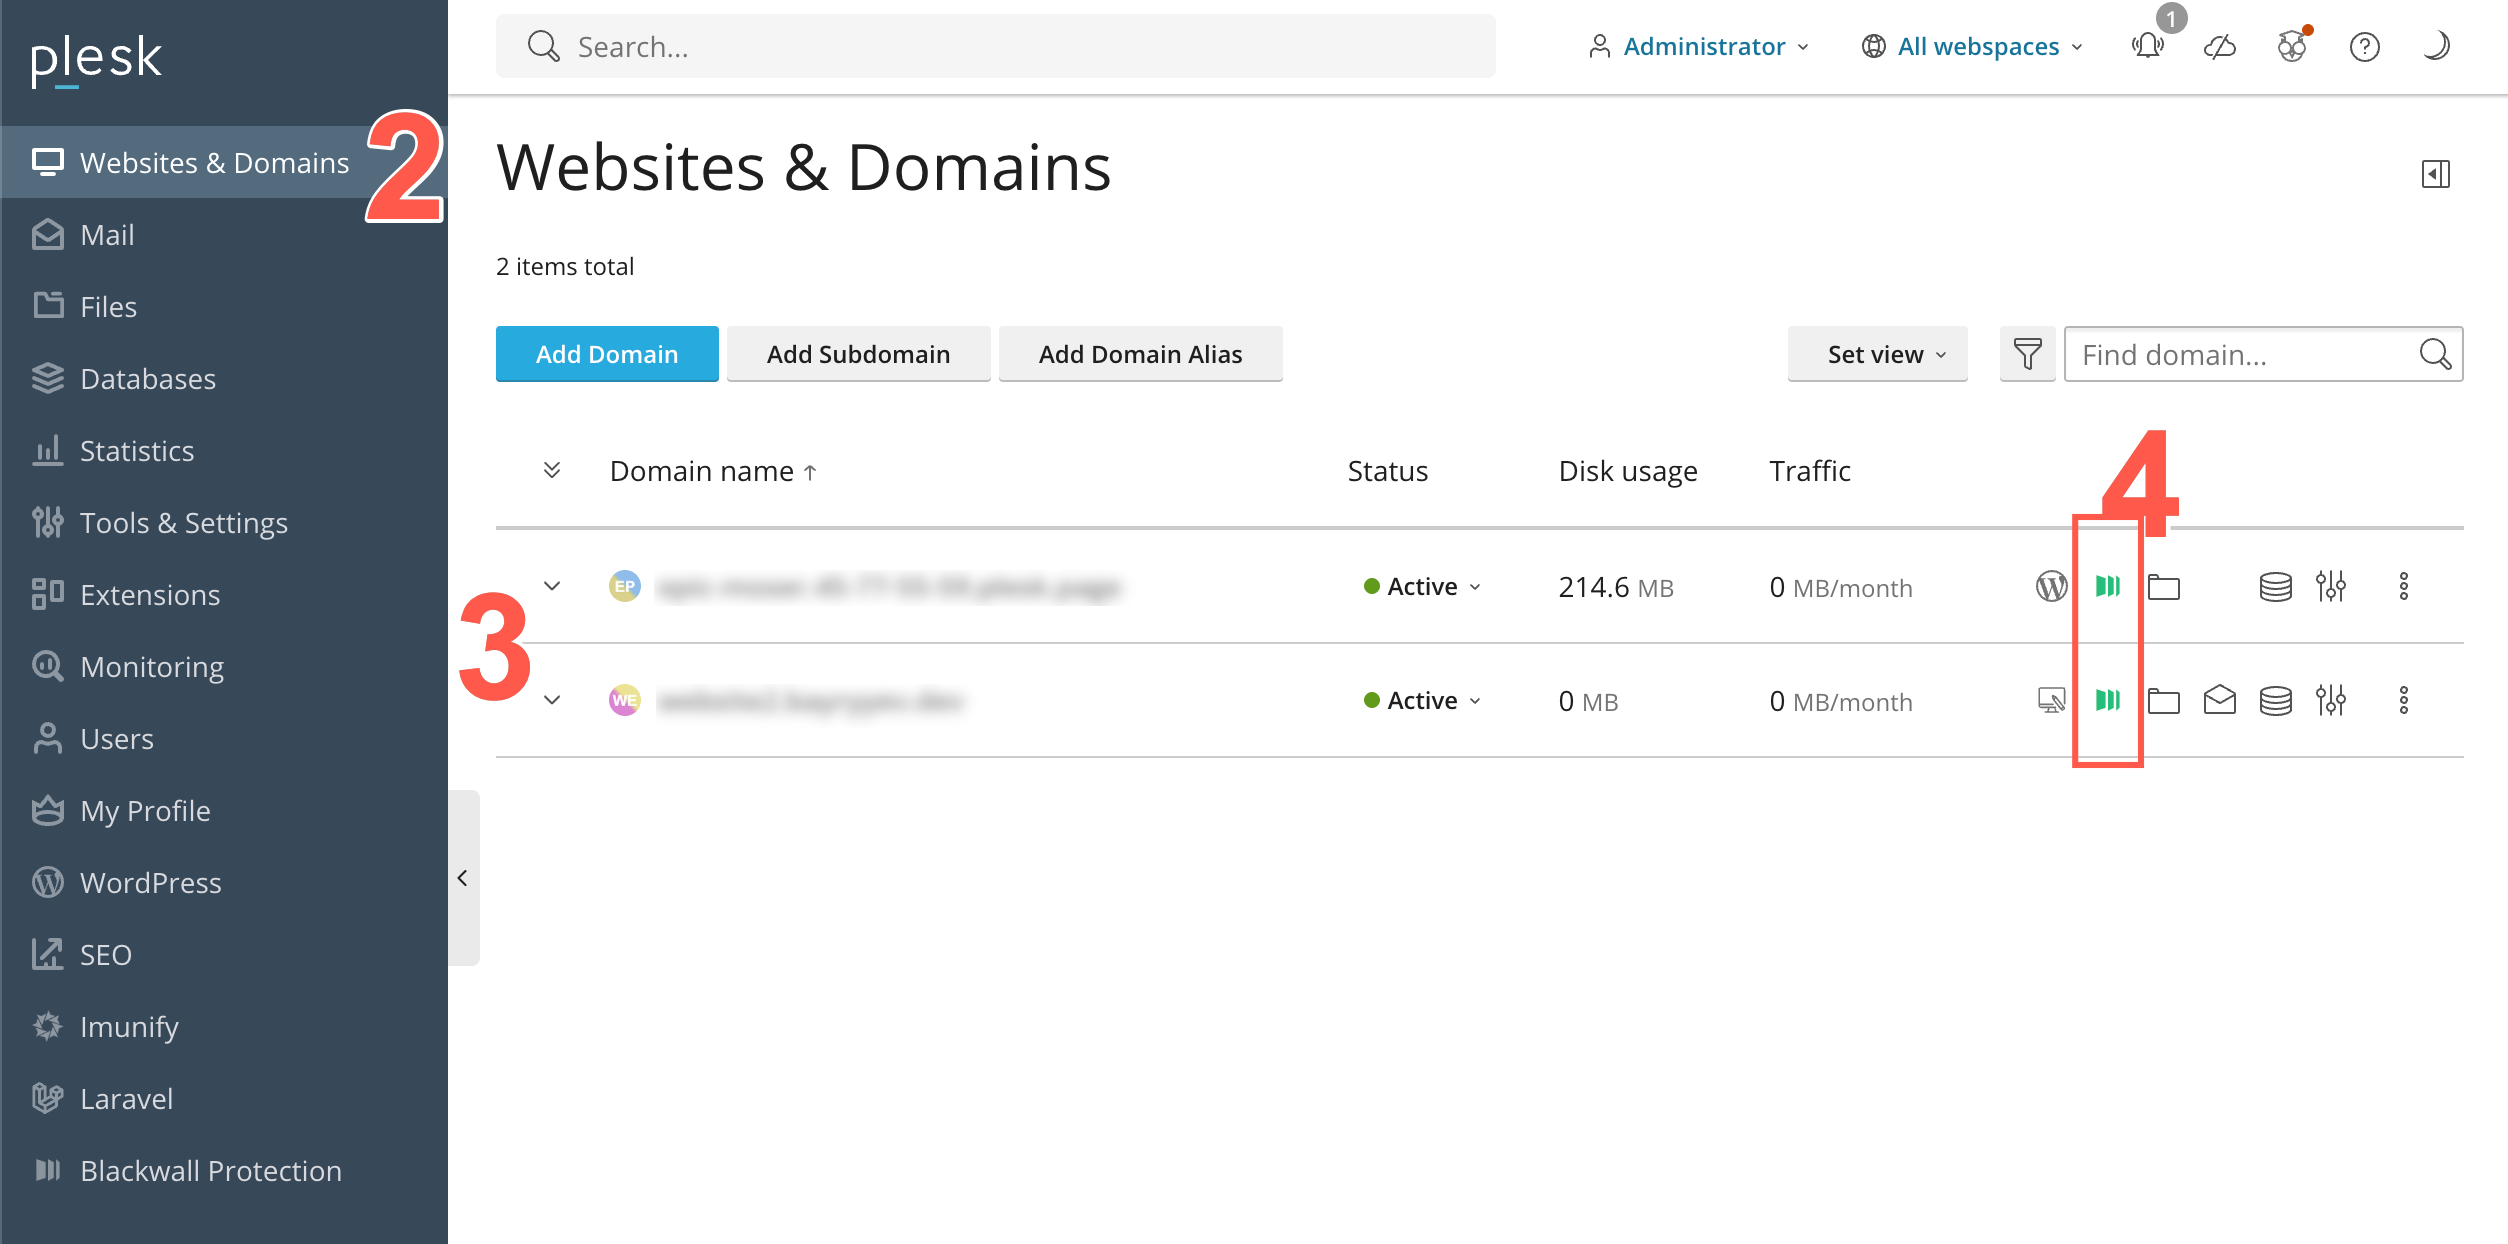
- Scroll the list of domains displayed until you find the one that you are looking for. Alternatively, use the Find domain search field at the top right of the page.
- Click the Blackwall icon that corresponds with your desired domain listing.
- When the Blackwall Protection page displays for your selected domain, click the Settings tab.
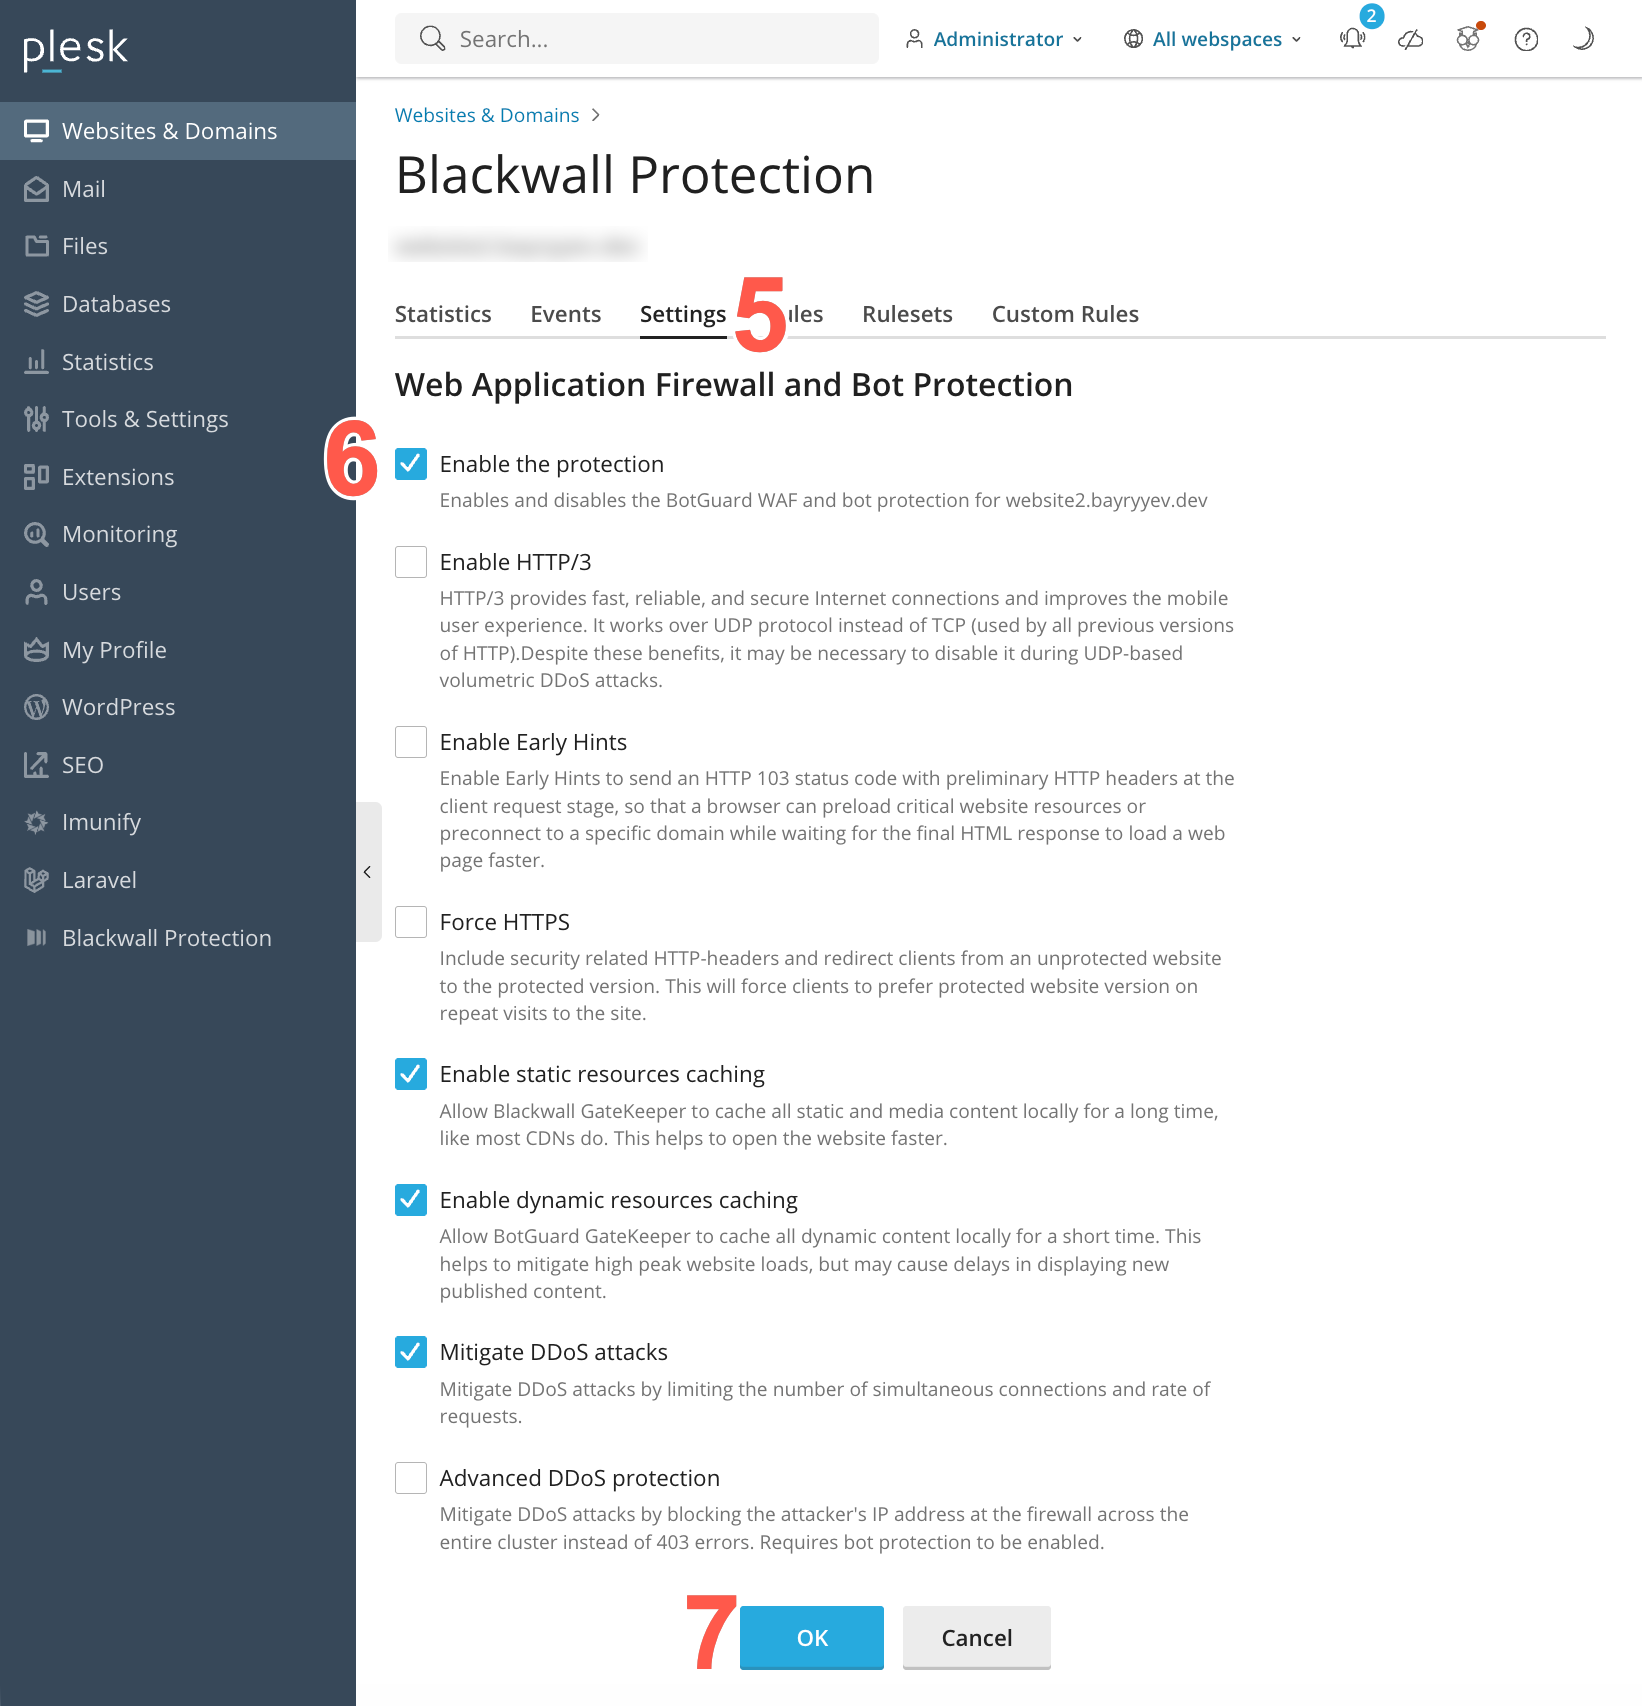
- From the list of options available, place a check in the Enable the protection checkbox.
- Click OK to save your changes.
- To verify that the service has been enabled successfully, from the left sidebar, select Websites & Domains again.
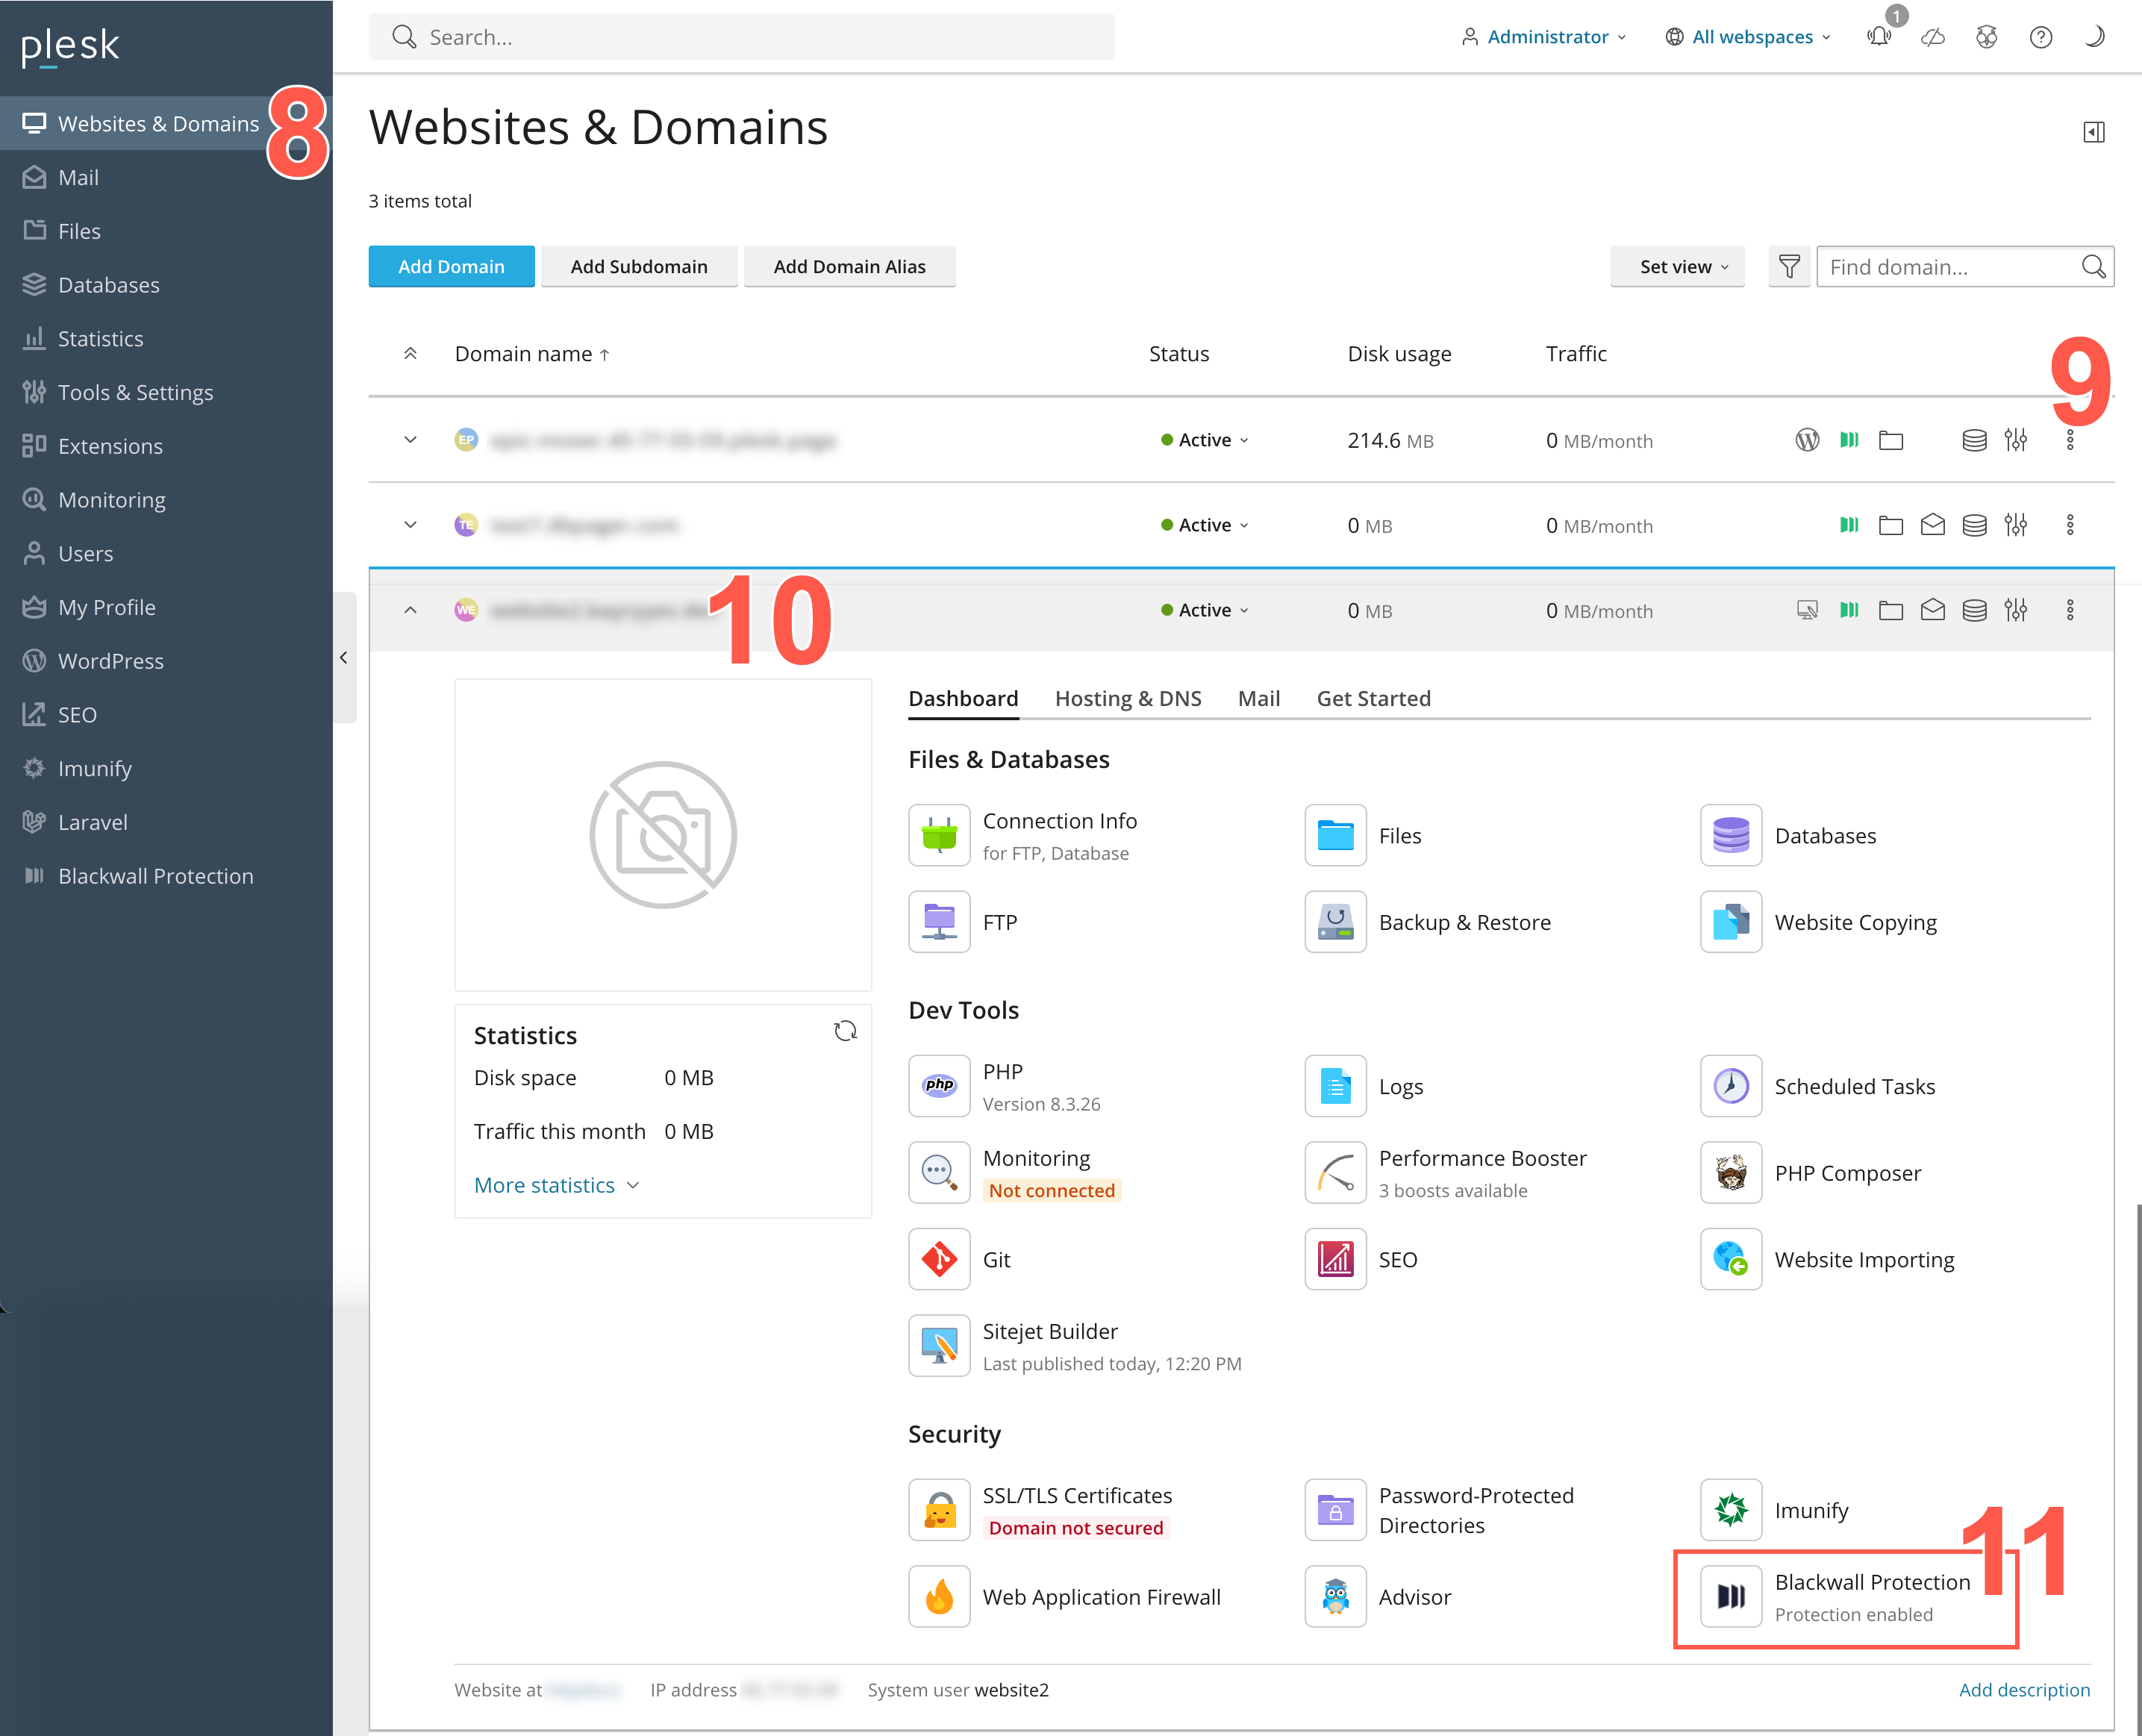
- Scroll the list of domains displayed until you find the one that you are looking for. Alternatively, use the Find domain search field at the top right of the page.
- Click the Domain name that corresponds with the domain listing that you wish to check.
- From the page of widgets displayed, scroll to the Security section and ensure that the Blackwall Protection widget displays Protection enabled under it.
Enabling/Disabling the Extension
To enable or disable your extension, perform the following actions:
- Log into your Plesk account.
- From the left sidebar, click Extensions.
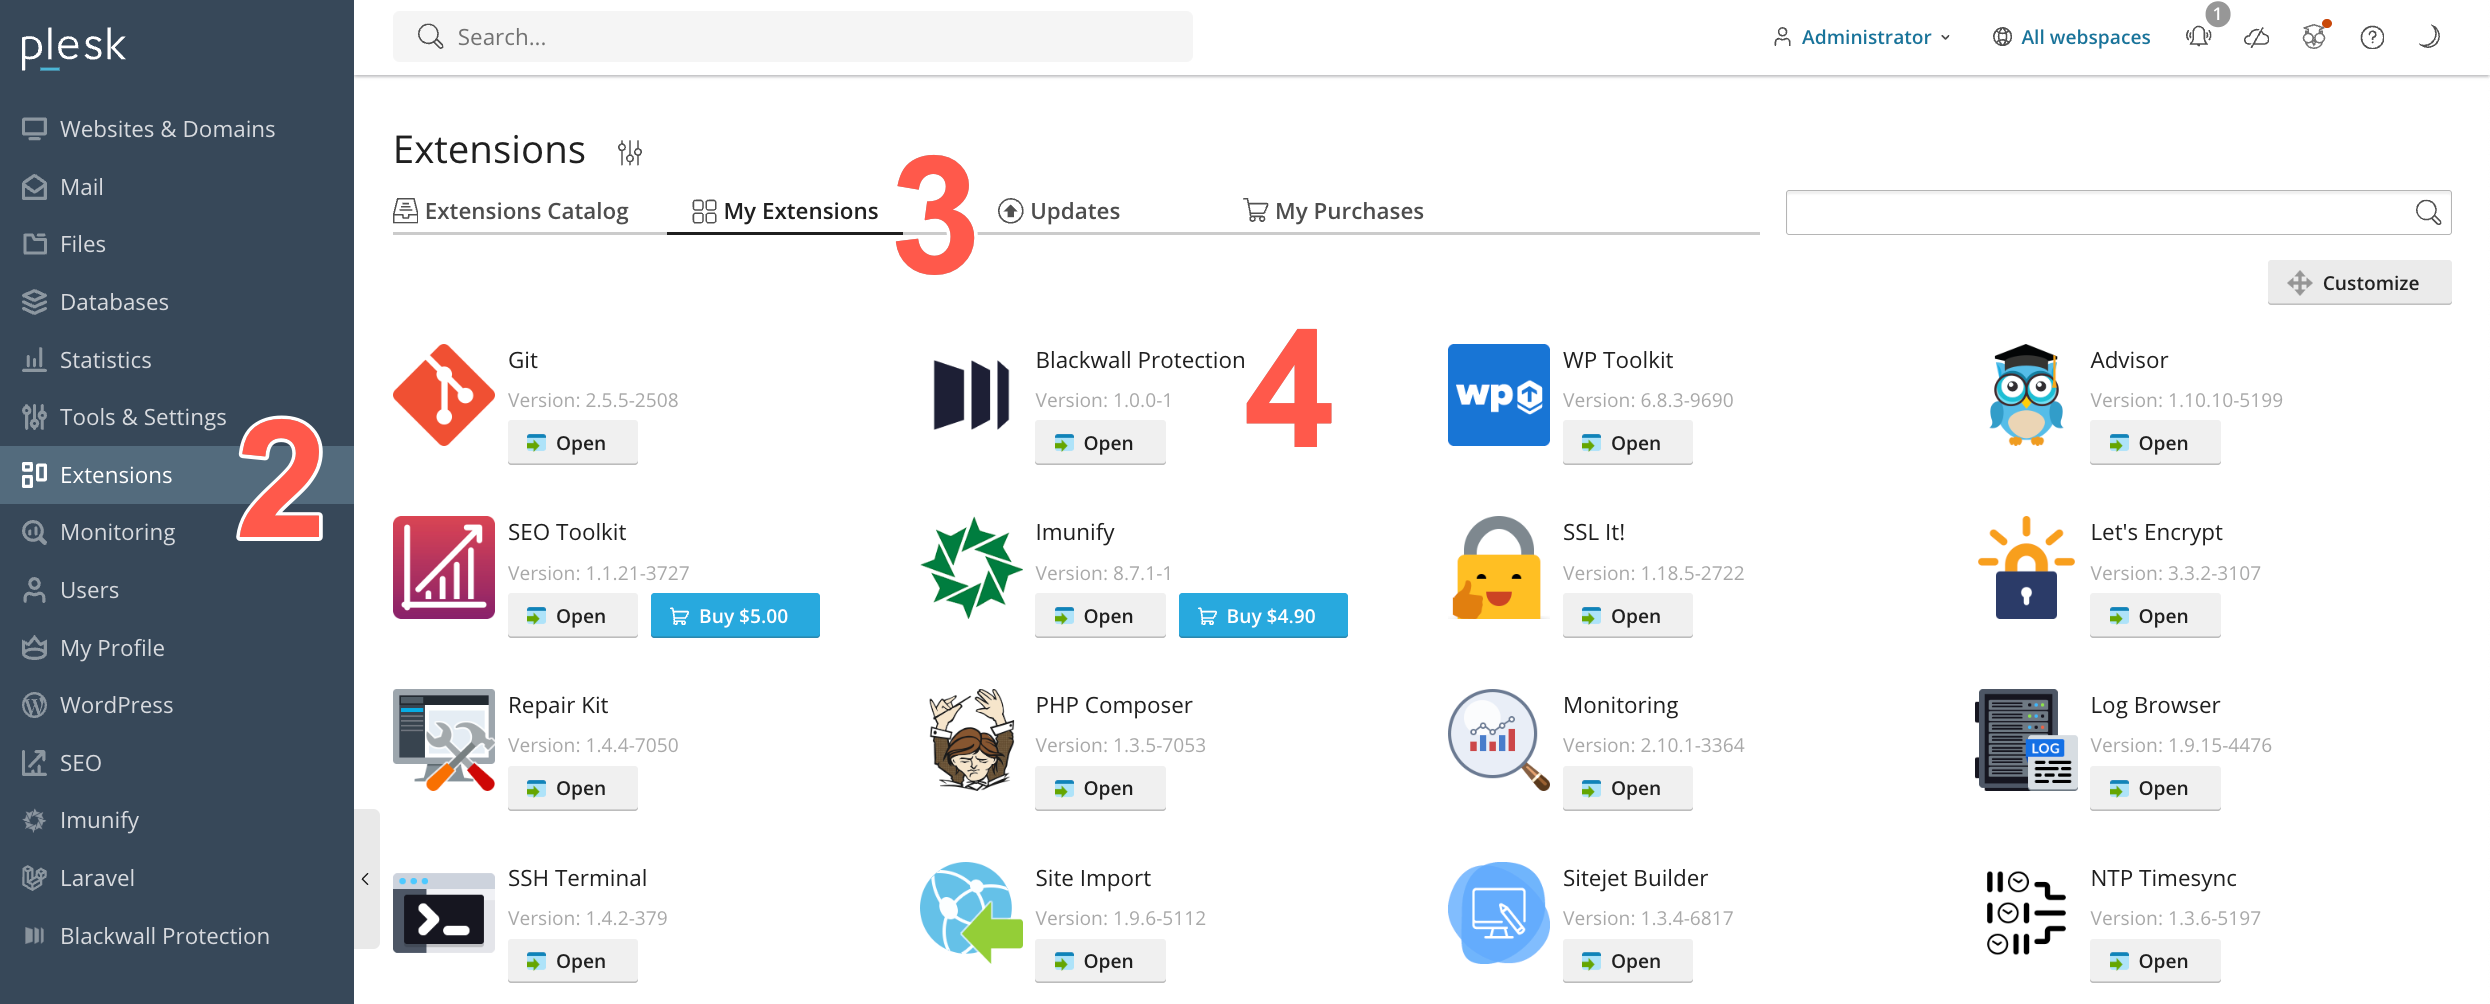
- Then click the My Extensions tab.
- Scroll the listed extensions until you find the Blackwall extension and click it.
- On the extension page that displays, click the extension's enable/disable button.
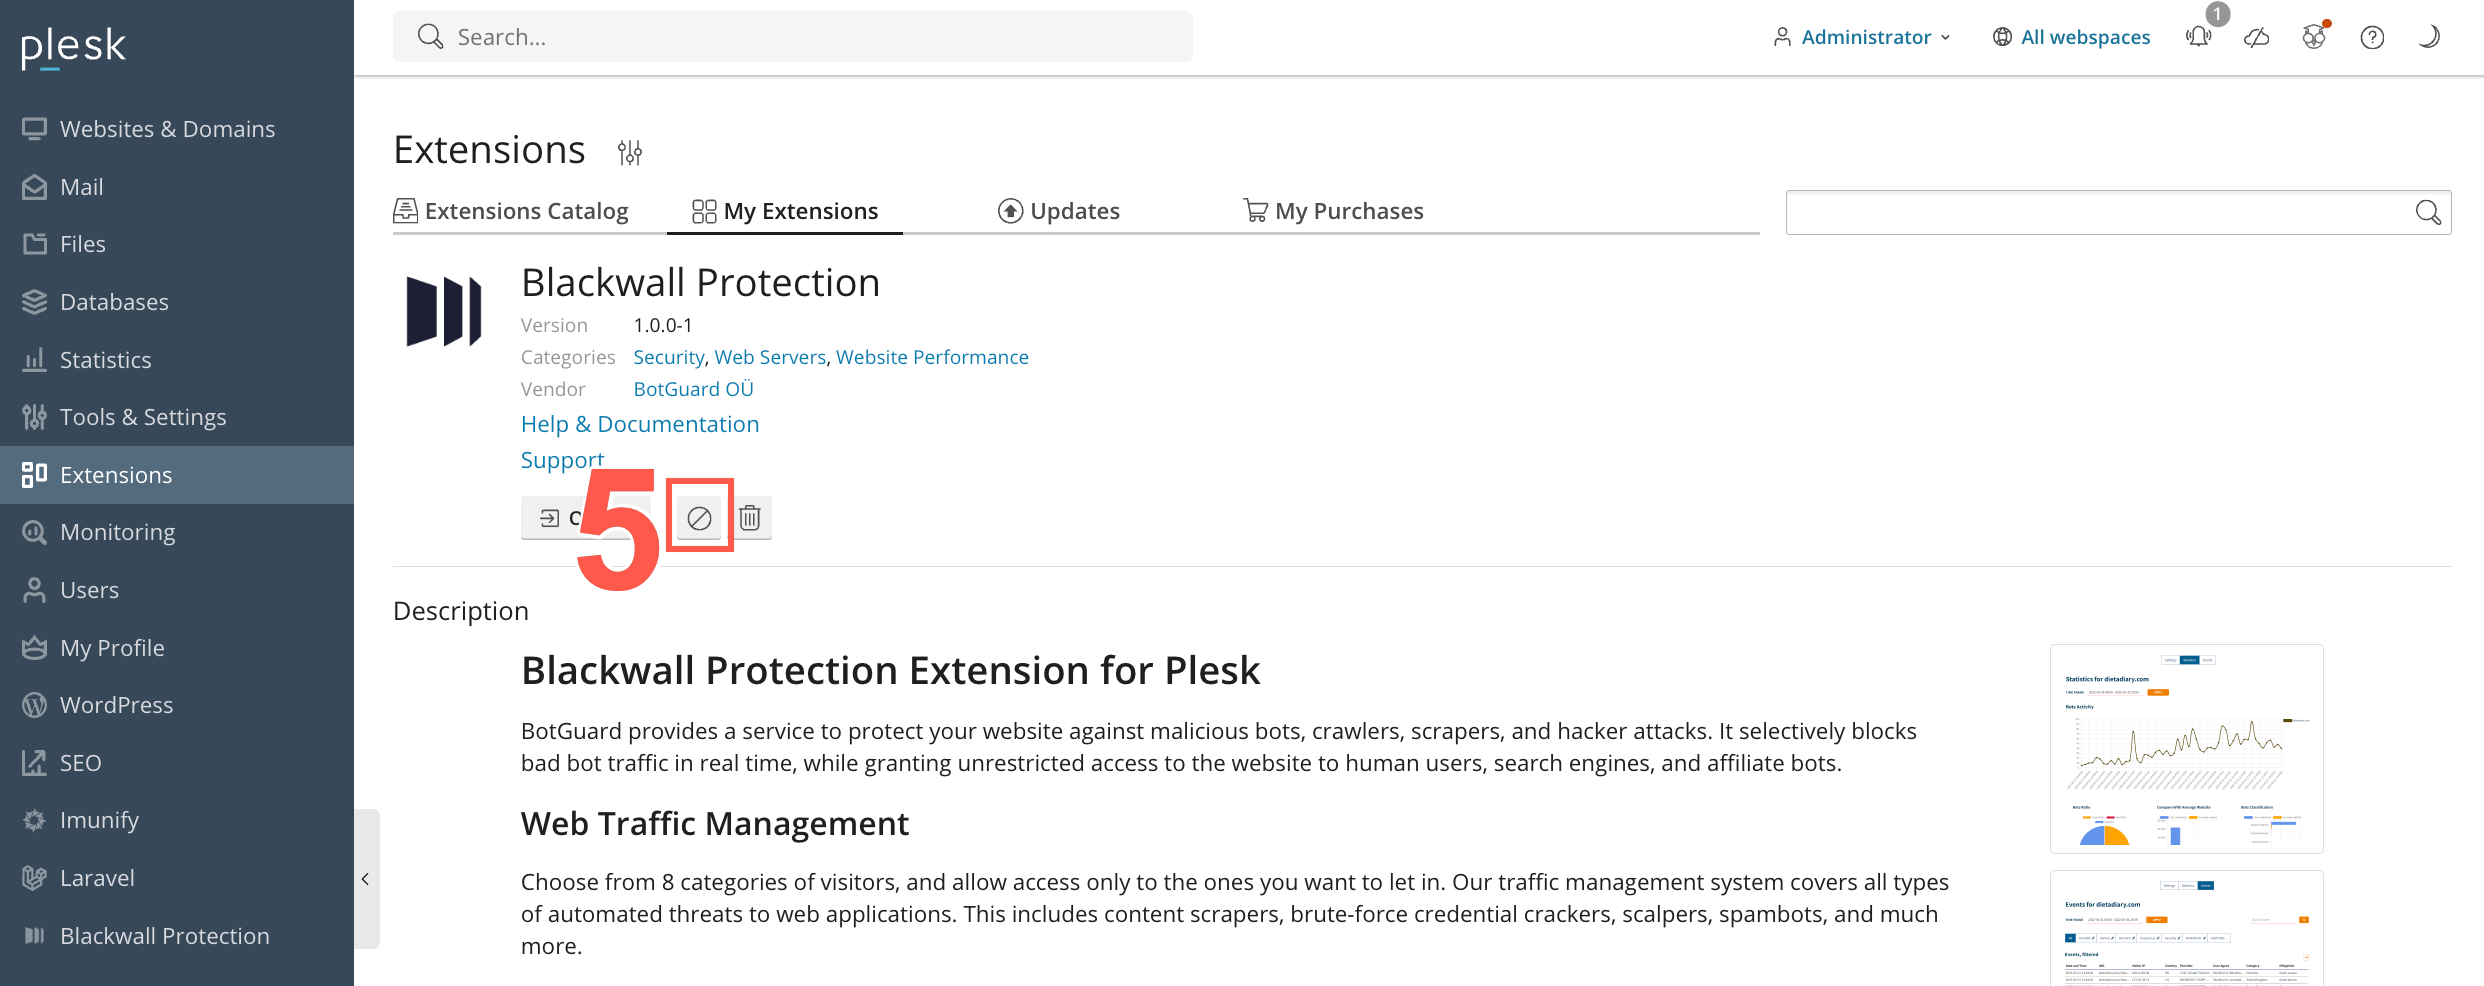
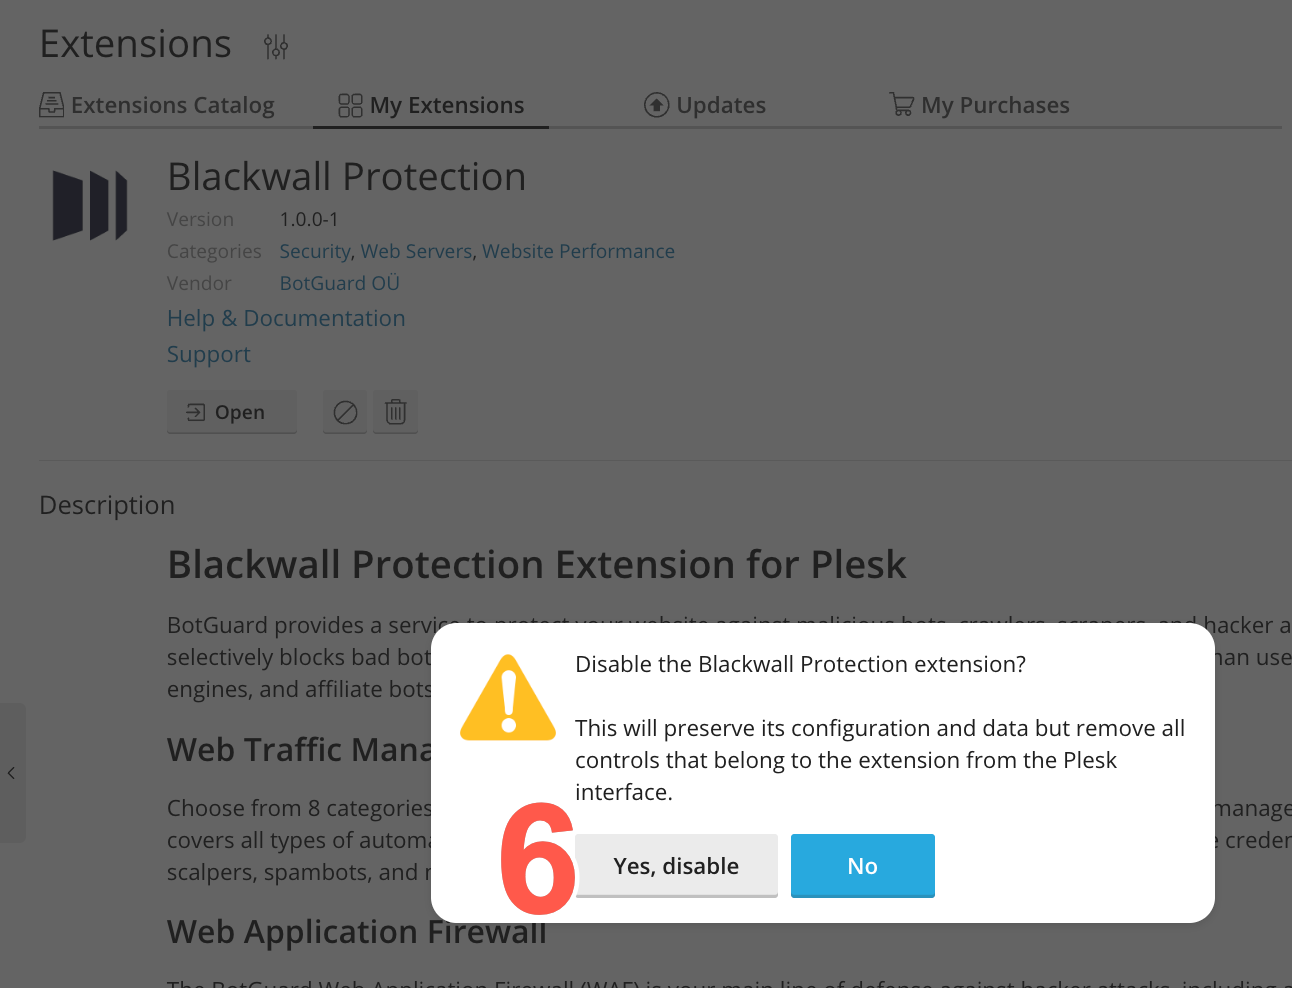
- When prompted about disabling the extension, click Yes, disable.
- You can enable the extension again at any time by clicking this same enable/disable button.
Uninstallation
To uninstall the Blackwall Plesk extension and all related modules, use one of the following two methods:
Using your system's terminal, run the following two commands in sequence:
To unistall your extension in the Plesk UI, perform the following actions:
- Log into your Plesk account.
- From the left sidebar, click Extensions.
- Then click the My Extensions tab.
- Scroll the listed extensions until you find the Blackwall extension and click it.
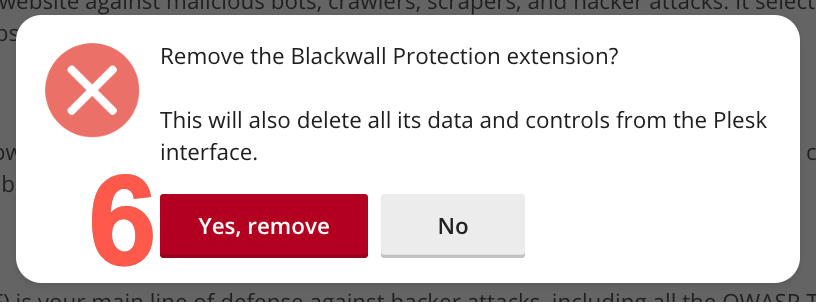
- On the extension page that displays, click the extension's removal button.
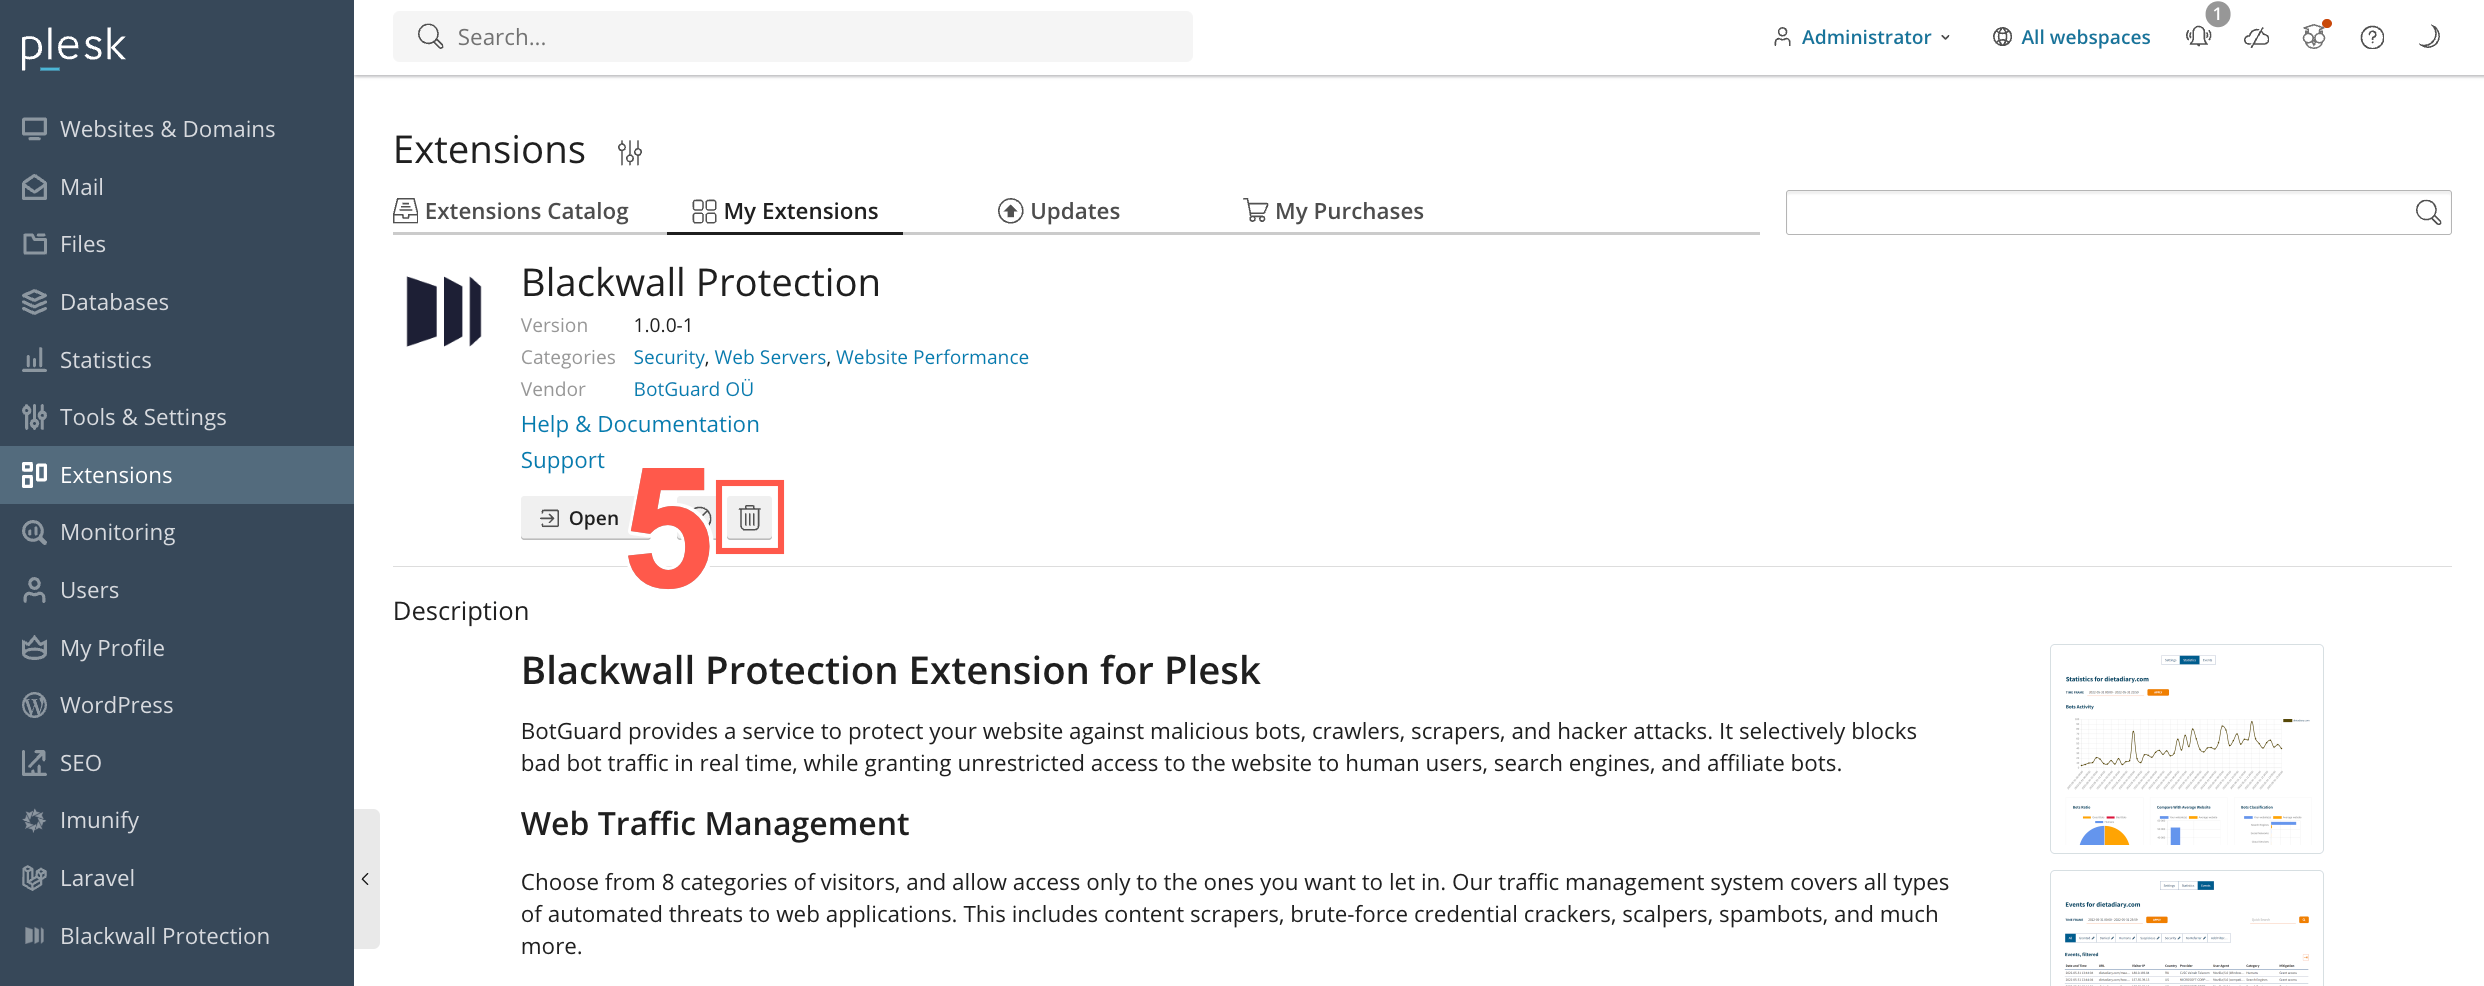
- When prompted about disabling the extension, click Yes, remove.